


Windows PC Webcam Not Working – What to Do
Let’s say you have an important online business meeting or a job interview coming up. You’ve prepared everything, but the camera stopped working. Luckily, there are ways to fix this. Here are some basic ways in which you can quickly fix your webcam on computers running Windows 7, 8, and 10 operating systems.
Unplug It and Plug It Back In
The first and oldest method of troubleshooting any electrical or electronic device is to turn it off and back on or unplug it and plug it back in. If you have a USB webcam, disconnect it and reconnect again. Additionally, you might want to restart your PC and check whether the camera starts working. If, on the other hand, you have a laptop with a built-in camera, try restarting it.
Check If Camera Was Disabled
Often, the problem with a non-operational camera is that it was somehow disabled. To fix this, you will have to enable it.
Here’s how to do it in Windows 7:
- Go to “Control Panel” and click on “Hardware and Sound”.
- Select “Device Manager”.
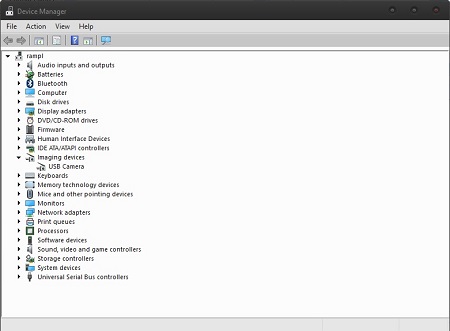
- Next, expand the “Imaging Devices” section.
- Once you’ve located your webcam, right-click on its icon.
- If it is disabled, click “Enable”.
Here are the instructions for Windows 8:
- Right-click the “Computer” icon and pick “Manage”.
- Pick “Device Manager” from the menu on the left.
- Find “Imaging Devices” section and expand it.
- Right-click on your camera’s icon.
- If it is disabled, click “Enable”.
Here are the steps for Windows 10:
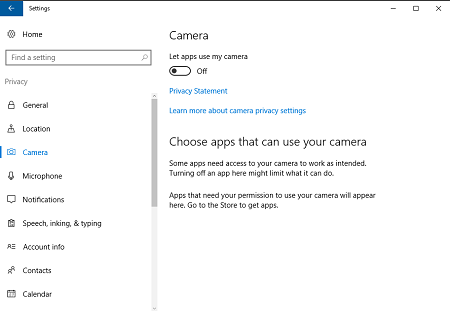
- Open “Settings app”.
- Click on “Privacy”.
- Select camera from the pane on the left.
- Click the slider beneath “Let apps use my camera hardware”.
Update the Drivers
Sometimes, the problem is not with the camera itself, but with the driver. If that is the case, you should see a yellow exclamation mark next to your camera’s icon in the device manager.
Here’s how to update camera drivers in Windows 7:
- Go to “Control panel” and open the “Hardware and Sound” section.
- Open “Device Manager” and expand the “Imaging Devices” section.
- Right-click on your camera’s icon and left-click “Update Driver Software”.
- Windows will then prompt you if you want it to search automatically or if you want to manually browse your computer. Use the latter if you know exactly where the driver is on your computer.
Here’s how to do it in Windows 8:
- Right-click the “Computer” icon and pick “Manage” option.
- Pick “Device Manager” from the menu on the left.
- Find “Imaging Devices” and expand it.
- Right-click on your camera’s icon and select “Update Driver Software” from the menu.
- Use the automatic search option. You can also use a manual search, but it is not recommended unless you know the exact location of the driver.
Here’s how it works in Windows 10:
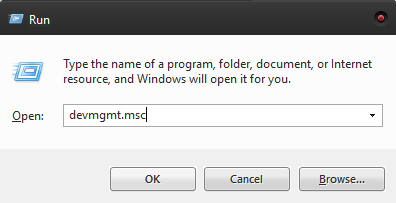
- Press the “Windows” key and the letter “R” simultaneously.
- Type “devmgmt.msc” in the search bar and press “Enter”.
- In the “Device Manager”, locate “Imaging Devices”. Click to expand this section.
- Right click on your webcam’s icon.
- Pick the “Update Driver Software” option.
- Again, you will be prompted to choose between browsing manually and letting Windows search for drivers instead of you. It is recommended to pick the first option.
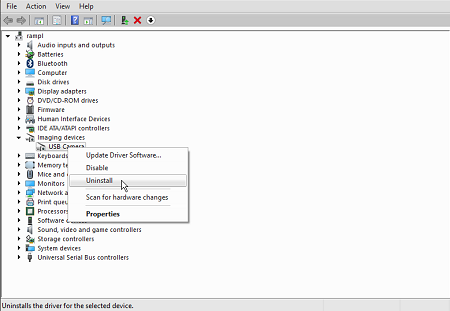
Reinstall the Drivers
If updating drivers does not help, you might want to try reinstalling them.
Here’s how to do it in Windows 7:
- Go to “Control Panel” and open the “Hardware and Sound” section.
- Open “Device Manager” and expand the “Imaging Devices” section.
- Right-click on your camera’s icon and left-click “Uninstall”.
- After the uninstall process is done, click the “Action” tab and select “Scan for hardware changes”.
- Windows will scan your computer and install the drivers.
Here’s how to do it in Windows 8:
- Right-click the “Computer” icon and pick “Manage” option.
- Pick “Device Manager” from the menu on the left.
- Find “Imaging Devices” and expand the section.
- Right-click on your camera’s icon and left-click “Uninstall”.
- After the uninstall process is done, click the “Action” tab and select “Scan for hardware changes”.
- Windows will scan your computer and install the drivers.
Here’s how to do it in Windows 10:
- Press the “Windows” key and the letter R simultaneously.
- Type “devmgmt.msc” in the search bar and press “Enter”.
- In the Device Manager, locate “Imaging Devices”. Click to expand the section.
- Right-click on your webcam’s icon and click “Uninstall”.
- After the uninstall process is done, click the “Action” tab and select “Scan for hardware changes”.
- Windows will scan your computer and install the drivers.
Conclusion
Having your webcam die at an inopportune moment can be a hassle. It can range from being a minor nuisance to a major problem. Now that you know how to deal with it, you will never have to be stuck with a non-functioning camera again.


