


How to Make a Time Lapse in iMovie

Time-lapse is a popular feature in video editing apps where you can speed up a clip up to 20 times. For example, a video of clouds gliding rapidly across the sky or the sun rising quickly in the morning. All these videos are made by a time-lapse technique.
It is possible to make a time-lapse with various video editing apps for both iOS and Android, and one of them is the popular iMovie app. If you have the iMovie app and you want to know how to utilize this feature, keep reading.
Time-Lapse in iMovie
If you have iMovie 10, you can make a time-lapse that goes up to 20 times faster than your usual recording. To perform a time-lapse in iMovie on your Mac, do the following:
- Open the iMovie app.
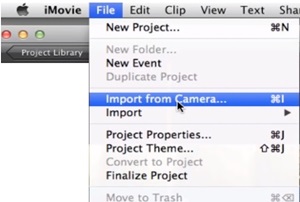
- Click on ‘File’ from the top of the app screen.
- Select ‘Import’ if you want to locate the video on your storage, or ‘Import from Camera’ if you want to load it directly from a connected device.

- Drag the video thumbnail from the ‘My media’ section to the timeline at the bottom. You should see the clip being separated into frames on the timeline.
- Select the clip from the timeline.
- Click the clock on the top of the media preview section.

- Choose the speed of the clip.
- Click the share button once you’re satisfied to either save the video or share it on social media.

Time Lapsing in iMovie 9
If you have an older version of iMovie, it uses a different approach to perform a time-lapse.
- Import a video in iMovie 9.
- Drag and drop it to the timeline.
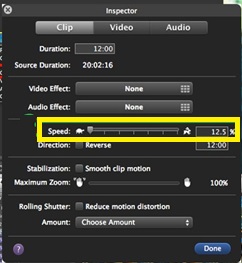
- Double-click the clip on the timeline. A new box will appear.
- Find the speed section and increase the bar to a satisfactory value.

Time Lapsing with iMovie on iOS
You can also create a time-lapse video with the iMovie iOS app. If you want to do it on your iPhone or iPad, do the following:
- Launch the iMovie app on your iOS device.
- Select the ‘Projects’ tab on the top of the screen.
- Tap ‘Create Project.’
- Load a clip that you want to edit.
- Tap the clip on the timeline. A little toolbox should appear at the bottom.
- Select the clock icon on the bottom-left of the screen. A speed bar should appear.

- Modify the speed bar and check the preview until you hit the value that suits you.
- Hit ‘Done’ after you’ve finished.
The video will be stored in your iMovie album.
Time Lapse with iPhone Camera
Did you know that you can record a time-lapse video directly with an iPhone camera? You don’t need the iMovie app. Of course, it requires you to record straight to your device.
- Open the Camera app.
- Swipe through the recording options on the bottom of the screen until you find ‘Timelapse.’
- Select it.

- Hit the ’Record’ button.
- After you’ve finished, hit the ‘Record’ button again.

The key to this option is that it will always compress the video to anywhere between 20 and 40 seconds. So if you leave the device to record for a longer time, the time-lapse will also be faster.
For example, if you record for only 5 minutes, the camera will record 5 frames per second, while 40 minutes will capture a frame after every four seconds. If you want to record an ideal time-lapse with your iPhone, it should last for about 30 minutes.
Alternatives
iMovie is a convenient video-editing app, but its time-lapse feature is not the best. If you want to make a proper time-lapse video (even one that captures a span of a few days), you should look for an alternative.
Here are some of the best options online:
- FrameLapse – An Android-only app that creates stunning time-lapse videos. It contains in-app calculator to measure the length of the video, set the maximum video duration so the app stops recording, and various other adjustments (color, exposure, zoom, focus, etc.).
- Lapse It – An app for both iOS and Android. You can create both time-lapse and stop motion videos with this app, import sequences from GoPro and DSLR, add songs, etc.
- Microsoft Hyperlapse – This simple but effective app does the basics just right. It can automatically lapse any video that you record, and it will do the same for all of the uploaded videos too.
- PicPac Stop – This app allows you to make time-lapse, slow motion, and stop motion videos. You can make a time-lapse video out of your images, and you can also create interesting stop motion animations and stories.
Time – It Goes So Fast When You’re Having Fun
It’s fairly simple to create a time-lapse video in iMovie, but at the same time, the feature is a bit limited. With only a few speed options to choose from, it doesn’t offer you as much flexibility as some other apps.
On the other hand, if you’re looking for a simple time-lapse app that doesn’t offer much more in terms of bells and whistles, then iMovies is the perfect choice.
Which app do you use to make time-lapse videos? What makes it better than other similar apps? Tell us about your favorites in the comments below.


