AI Tools vs Photoshop: Which Is Best for Colorizing Black & White Photos?

Most people assume Photoshop is complicated, time-consuming, and something only professionals can handle. That’s why, if you’re a beginner looking to colorize a black-and-white photo, you might not even consider using it.
What I intend to do in this article is debunk this misconception of Photoshop being ‘too hard’. Yes, it has every tool a professional photo editor needs, and mastering them takes time.
But for tasks like colorizing photos, it’s far more accessible than most people think.
In this guide, you’ll discover the pros and cons of using AI online tools vs Photoshop. I’ll also walk you through a step-by-step method to colorize a photo in Photoshop.
As a bonus, I’ll also show you how to do it using Photoshop on the web for a best-of-both-worlds approach.
AI Colorization Tools Online
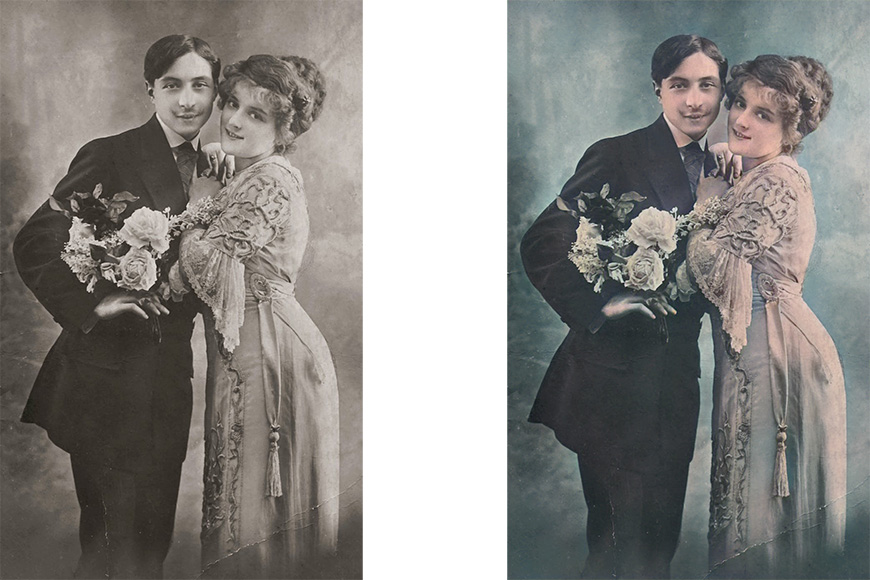
Colorization done with Img2go
It’s easy to see why AI-powered colorization tools have exploded in popularity. For most people, the first instinct is to search for a quick, one-click solution – and in many cases, this may be enough.
However, these tools aren’t perfect, and convenience usually means trade-offs.
Pros
One-click simplicity. Most online AI tools only require you to upload your black-and-white image and click a button to automatically colorize it. This certainly is convenient: no sliders, no layers, no decisions to make or skills to master.
Speed. Generally speaking, all you need to do to colorize a photo is create an account and upload your image; there’s no need to install software or learn how to use it.
Plus, the colorization itself happens in seconds. Considering the entire process, you can potentially get a good enough result in just a few minutes.
Accessibility. Since there’s no software to install or system requirements to meet, you can use the AI colorization tool on any computer in a web browser. All you need is an internet connection.
Cons
Having considered all the advantages, it’s also fair to keep in mind the trade-offs.
Limited control. The same simplicity that makes these tools appealing also limits how much fine-tuning you can do of the results – what the AI decided was best is what you get. You’ll likely have little to no control over which colors are applied or how.
Quality limitations. Depending on the platform, you may encounter resolution limits, compression artifacts, or a loss of fine detail. This can affect the overall quality of the image.
Privacy and data concerns. Not every platform is transparent about its privacy and safety policies. Uploading personal or historical photos to third-party platforms isn’t always ideal.
Ethical and usage concerns. Every AI model is trained on thousands of photos, and not all of them comply with the legal requirements for using images that way. This isn’t just an ethical issue; it may also pose risks or restrictions when you need your images for commercial or branded content.
How Does Photoshop Compare to AI Colorizing Tools?
Photoshop makes constant updates that not everyone is aware of, and recent versions have evolved significantly, including built-in AI features that lower the entry barrier.
Long before the current wave of generative AI tools, Adobe introduced Neural Filters. These are machine learning-powered features designed to handle complex edits with minimal effort. Among them, there’s a Colorize tool.
I want to show you how easy it is to colorize a black-and-white photo in Photoshop and how much you can gain compared to the AI colorizing tools you can find online. After showing you, I’ll recap the pros and cons.
How to Colorize a Black-and-White Photo Using Photoshop? Step-by-Step Guide
Step 1. Download and launch Photoshop on your computer. To do this, you must subscribe to a Creative Cloud membership that includes Photoshop; they offer a free trial.
Step 2. Open your image in Photoshop and change it to RGB mode. You can simply drag and drop the image into Photoshop, or use the Open command on the left side.
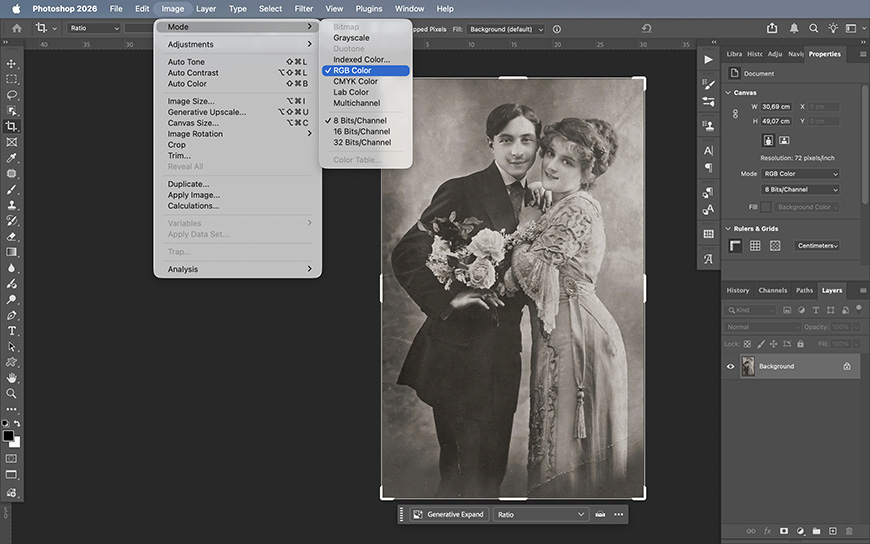
Once it’s open, go to the menu Image > Mode and make sure the image is in RGB mode. If it’s not, click on it to change it because a photo in greyscale mode won’t support color.
Step 3. Open the Neural Filters. Once you have the photo open in Photoshop, click the Filter menu, then Neural Filters.

Step 4. Apply the Colorizing Filter. Not all Neural Filters are installed by default. If this is your first time, you may need to install it – just click the button right on the filter, you don’t need to do anything else.
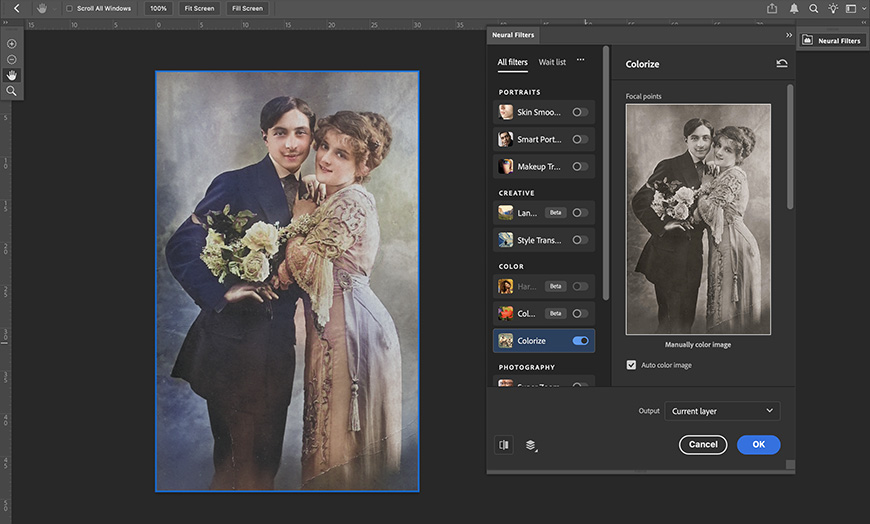
After a few seconds, the filter will be available – simply toggle the switch to enable it, and you’ll see a preview of your photo colorized. The next time you want to use the Colorize filter, it will already be installed, so you’ll only need to turn it on.
Step 5. Fine-tune the result. So far, you’ve accomplished the same thing as you would with an AI online tool – but this is where the magic begins.
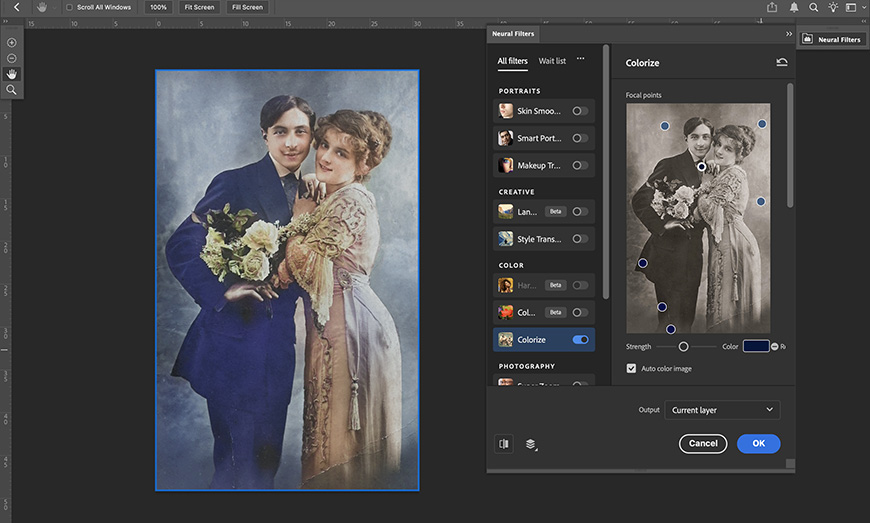
Now you can click on any part of the photo to add a Focal Point. Then, click on the color swatch and choose whichever color you want. This allows you to colorize specific parts of the photograph without having to deal with selections.

You can also use the Profile presets and the Adjustment sliders to easily achieve the result you want.
Step 6. Another advantage of using Photoshop is that you have many outlets for your colorized photo. You can output it as a new document, a new layer, a smart filter that allows you further modifications whenever you want, etc.
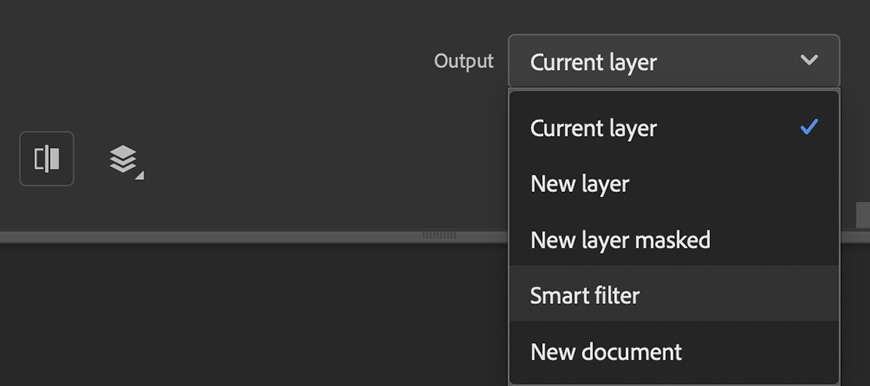
Remember that once you’ve colorized your image, you can keep editing your photo with all of Photoshop’s tools using Layers to do it non-destructively.
That’s all it takes. The process is just as streamlined as most online tools, but it offers much more flexibility if you want to go further.
So, how does this compare to one-click AI colorization tools? Here’s a quick breakdown.
Pros
One-click simplicity. Even though Photoshop is full-featured editing software, it can function like a one-click AI tool. You can apply the Colorize filter and get instant results without any manual adjustments.
Full control. Unlike most AI tools, you can fine-tune the result to your liking. Tweak colors on each part of the picture without complex selections, adjust tones, saturation, and more.
For the more experienced users, you can also use Layers, masking, and plenty of additional tools to work at pixel-level precision.
Better privacy and transparency. Adobe clearly discloses that none of your images are used for AI training. Since everything runs locally, you stay in control of your files.
Commercial use. Images edited in Photoshop – including those using AI and Neural Filters – can be used for commercial purposes without uncertainty.
More responsible AI training. Adobe has publicly emphasized that its AI models are trained on licensed data and content with proper authorization, which helps address some of the ethical concerns around generative AI.
Cons
Desktop-based. On the downside, using Photoshop’s desktop version requires installing it on your computer. This limits you to devices where the software is available, unlike browser-based AI tools, which you can access from anywhere.
Colorizing Photos Using Photoshop Online: The Best of Both Worlds
If the main drawback of using Photoshop is that it needs to be installed on your computer, then Photoshop Online aims to solve exactly that.
The web version of Photoshop combines the simplicity of browser-based AI tools with the structure and reliability of Photoshop, making it a strong middle ground for most users.
Do keep in mind that this method uses generative AI. If fidelity is your priority, then stick to Photoshop on desktop; don’t use AI online tools or Photoshop on the web.
Here’s how to colorize a black-and-white photo using Photoshop online.
Step 1. Go to Photoshop on the web and log in to your Adobe account. You can do this on any computer with Internet access; there’s no need to download or install anything.

Step 2. Upload your image. You can drag and drop your file on the screen, or use the Create button, which has a plus symbol – you’ll find this on the top left. It’s useful to know that you can import files directly from your Google Drive.
Step 3 (optional). If you don’t want to colorize the entire image, but only add a splash of color, you can make a selection.
Remember that you have AI options to help you do this effortlessly. At the bottom of the Quick Actions, you’ll find the Detect Objects feature that gives you a few starting points, like different subjects or backgrounds.
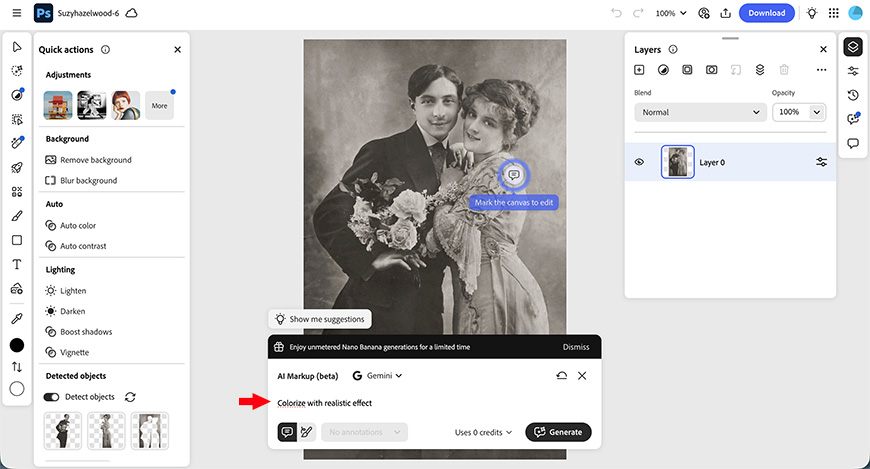
Step 4. Type your prompt. As you open your photo, you’ll see the AI Markup window. Here, simply type the word Colorzize, and the program will understand, but you can be more specific in your request. In this example, I asked for realistic results.
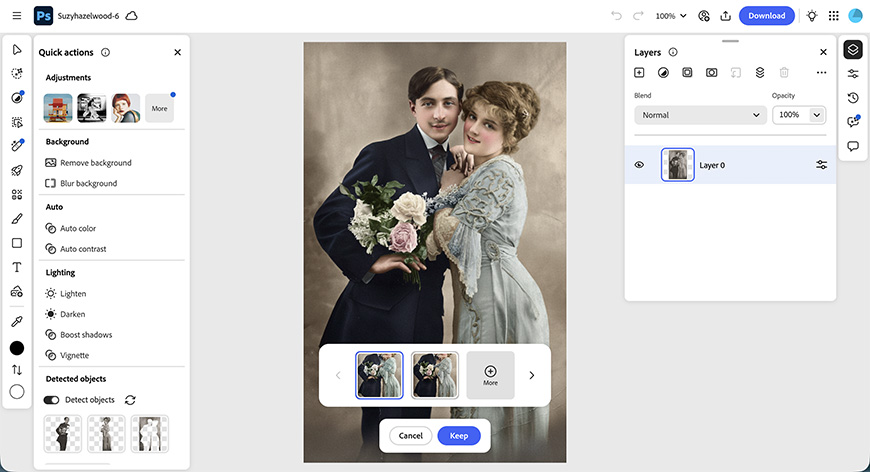
Step 5. Select your preferred result. You’ll receive two different versions of your image. Click on the one you like best or ask for more variations.
Step 6. Ask for modifications (optional). If there are things you didn’t like, you can ask Photoshop to change them using a new prompt.
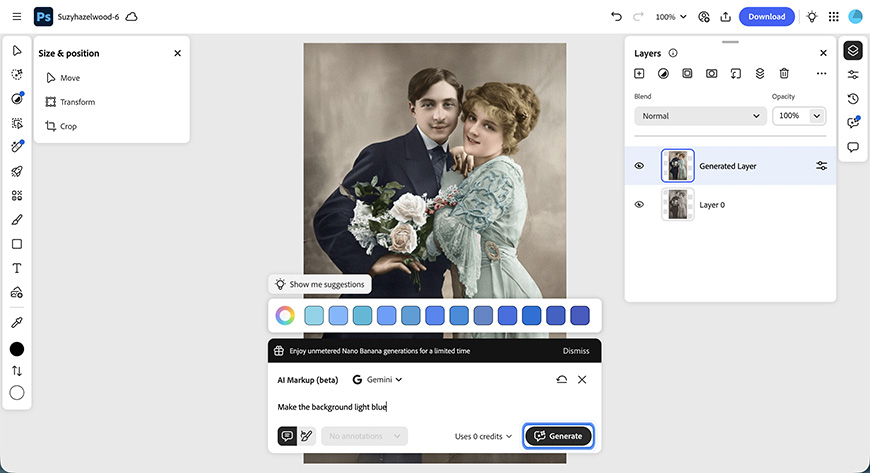
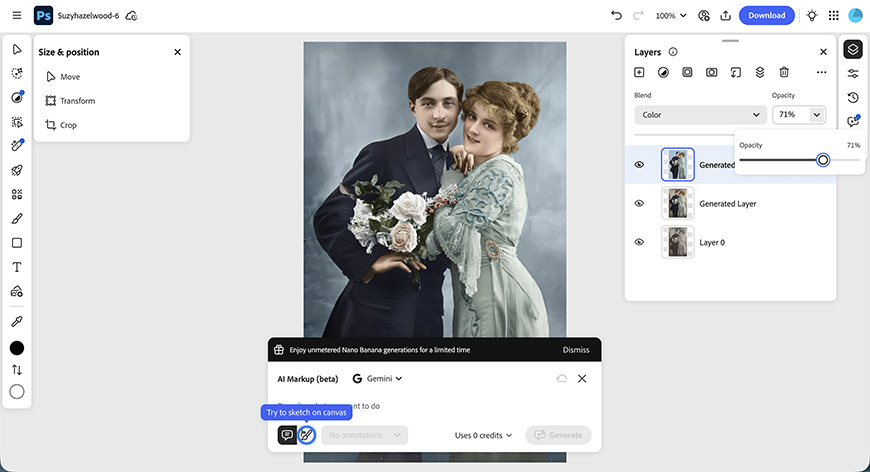
Each change will appear as a new layer, so you can change the blend mode, apply masks to create a composite, or edit them individually.
Step 7. Download your photo. Once you’re satisfied with your colorization, you can download your photo to your computer or phone.
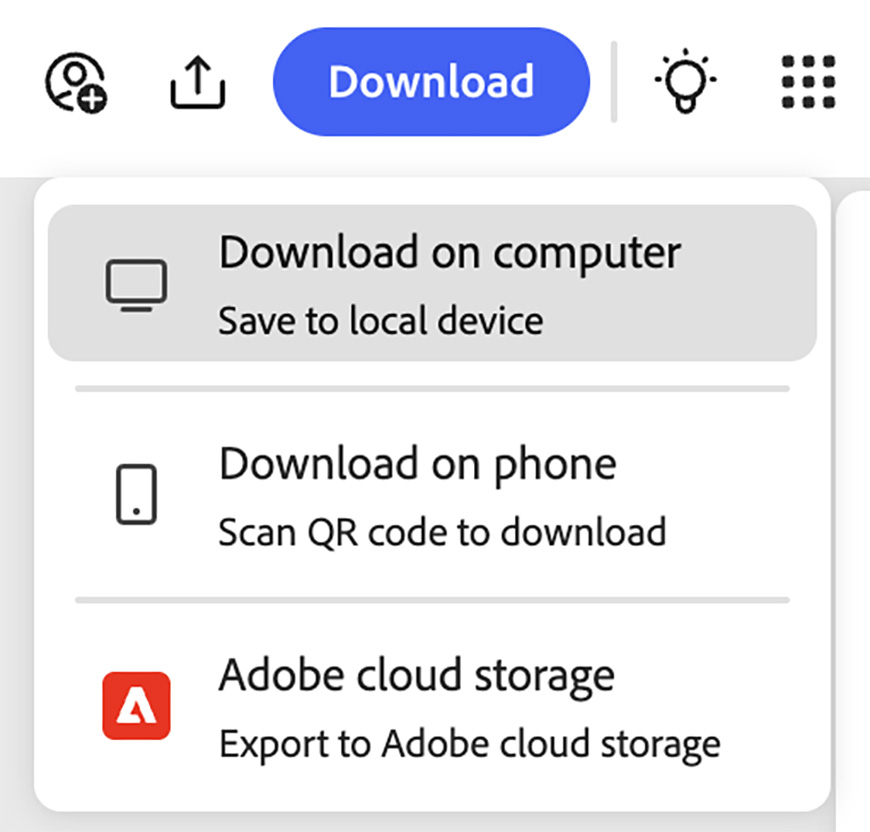
It’s also possible to save them in Adobe Cloud Storage, send them to any Adobe app, or share your file with a collaborator.
The process is simple, but unlike most AI tools, you’re not stuck with a single result. Let’s recap the pros and cons
Pros
Accessible anywhere. Since it’s browser-based, you can use Photoshop online on any device with an internet connection, just like you would with other AI colorizing tools. There’s no need to install any software.
Easy to use. Compared to the desktop version, Photoshop Web has a more user-friendly interface and an easier learning curve. Thanks to generative AI, you can turn text into editing actions without any effort.
Flexibility. Combining generative AI with the wide array of editing tools available in the Photoshop web, you can colorize your images with precision and get professional-quality results. You remain in control while AI does the heavy lifting.
Non-destructive workflow. As with the desktop version, edits can be applied to separate layers. So, you’re never locked into a single result.
Safer ecosystem. Even if online, you’re still working within Adobe’s environment, which ensures privacy and safety.
Allows collaborative work. Using Photoshop on the web, you can collaborate with your team members by sharing the link to your document. You can also add marks inside the canvas to leave specific instructions for the other person.
Cons
Lower fidelity than Neural Filters. While generative AI is powerful, it may not always match the accuracy and nuance of Photoshop’s Neural Filters. This is mostly OK for personal use and experimentation, but it may be an issue for historical images.
Fewer editing tools. Photoshop online is still a simplified version of the full software. It certainly offers many more options than an AI colorizing tool, but it may feel limited for advanced users compared to the desktop experience.
Final Thoughts: AI Tools vs Photoshop for Colorizing Photos
If you don’t need much control over the final result, it’s hard to beat the immediacy of most online AI colorization tools. They’re fast, simple, and get the job done with minimal effort.
That said, there’s the important issue of privacy and transparency. It’s always worth checking the terms and conditions of any tool you use, whether it’s browser-based or installed software.
In the current AI landscape, understanding how your images are stored and used is more important than ever.
On the other hand, if you want flexibility and control over how your photo turns out, Adobe Photoshop is the better choice.
It lets you refine, adjust, and perfect the result, even when using AI-powered tools to simplify the work.
Whether you go with the full desktop version for maximum fidelity and complete editing control, or opt for Photoshop web for a more accessible, streamlined experience, you’re getting a solution that combines the AI convenience with decision-making power.
But don’t just take my word for it. Adobe offers a 7-day free trial of Photoshop, which gives you access to both the desktop and web versions, so you can try both methods I showed you in this article.
You’ll also get limited access to the partner AI models on desktop and, for a limited time, free use of them in the web version.