How to Automatically Transfer & Backup Photos from iPhone to Mac

One of the best things about Apple’s ecosystem is that it allows you to easily transfer photos from an iPhone to a Mac. But you should know that the fully automatic transfer and backup is only available via iCloud.
That said, you can do it using certain native apps but the option isn’t automatic. Be that as it may, this write-up focuses on auto transfers, with the addition of two manual methods. Keep reading to find out more.
iCloud Storage
The only truly automatic transfer and backup method is with the iCloud storage. By default, your iPhone is set to move all new photos and videos to iCloud. The best thing about this option is that all the edits and changes you make on the photos also get synced to the Cloud.
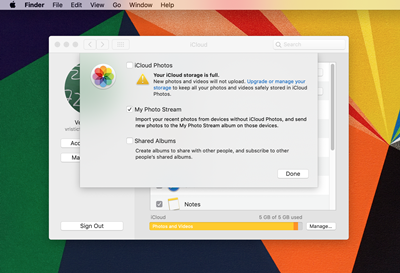
However, you only get 5GB of free storage, which gets used up quickly. Unless you purchase more storage, you’ll need to manually download the photos from iCloud to your Mac.
Important Notes
First, you need to make sure that both your Mac and iPhone are running the latest software update. Then, iCloud needs to be set up on all your devices and you have to sign in with the same Apple ID. Of course, a Wi-Fi connection is a must but you don’t need to be connected to the same network for the trick to work.
Setting Up iCloud Photos
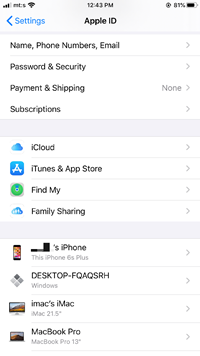
Launch the Settings app on your iPhone, tap your name, then choose iCloud.
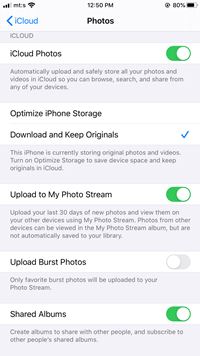
Tap on the button next to iCloud Photos to toggle the option on. You can also toggle on the “Upload to My Photo Stream” option because it automatically collects and stores photos from other connected Apple devices.
Now, move to your Mac, launch System Preferences, and select iCloud. You need to click or tap the Options button (it’s located next to Photos) and choose iCloud Photos.
Things to Know
If you toggle on iCloud Photos after you’ve synced the images via iTunes, the “Photos and Videos Synced from iTunes will be Removed” message appears. There’s no need to panic because the photos that have been backed up on the computer stay there. They’re only removed from your iPhone.
Turning on iCloud Photos on a Mac gives you access to the removed images. To be exact, the action automatically uploads the images to iCloud so you can access them on any of your iOS devices. Of course, you need to log in with the same Apple ID.
Manual Methods
For manual transfer methods, you’ll need a USB Type-C cable and the following ones take advantage of the native macOS apps.
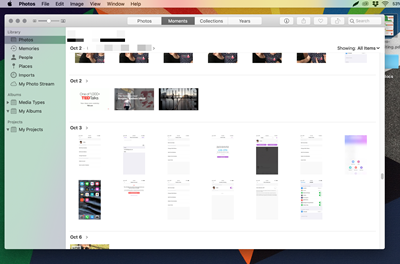
The Photos App
This is probably the easiest and quickest method to transfer photos. Here are the necessary steps:
Step 1
Grab the USB cable and connect your Mac to your iPhone. The Photos app should automatically launch when you connect the two devices. If it doesn’t open the app via the Dock or Launchpad.
Note: Your iPhone needs to be unlocked for the transfer to work and you might be prompted to allow access to the device. There’s a pop-up window that asks you to “Trust This Computer”. Tap or click Trust and you’re good to go.
Step 2
Once the connection is established, you should be able to see your iPhone under Devices in the Photos menu on the left. Click on your phone and the images and videos from your Camera Roll should immediately appear.
Step 3
To upload all images, select “Import All New Photos”. Of course, you can bulk select different images and upload only them. There’s also an option to auto-delete the photos from your iPhone once you transfer them to your Mac.
Tip: As mentioned, Photos should open automatically when you connect the two devices. You can disable this option from the Photos app, just uncheck the option labeled “Open Photos for This Device”.
The Image Capture App
The Image Capture app is among the oldest on macOS. Originally, it was designed to transfer images from third-party devices way before the first iPhone. Nevertheless, it’s still a great option to back up and organize your iPhone photos on a Mac. Here’s how to use it.
Step 1
Plug in your iPhone and launch Image Capture. Again, your iPhone appears under Devices and there’s a list of all photos.
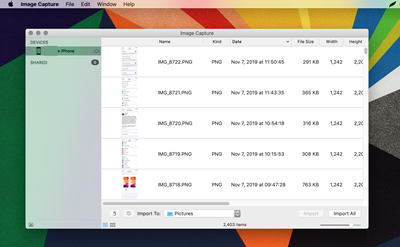
A great thing about using Image Capture is that the app provides detailed information about each image.
Step 2
To transfer the images, select the destination folder next to “Import to” and select the images you’d like to move. There’s also an option to “Import All” and you can increase or decrease the thumbnail preview by moving the slider under the import button.
Save the Family Album
As you can see, it’s simple to auto-transfer and back up images from your iPhone to your Mac. The manual methods are quite handy as well and there are some third-party apps that offer automatic image transfers.
Which of the methods do you find most useful? Do you store any other files on your iCloud account? Tell us more in the comments section below.