How To Change the Initial View Controller

In the process of making mobile applications, developers usually come across the problem of changing their app’s initial view controller. Based on the IDE (Integrated Development Environment) and the programming language that you are using, this can be quite a dead end, especially for inexperienced programmers.
Let’s say that you are making an app that requires users to sign in. Of course, you would want to open your sign in view controller first. However, it would be pointless to open the same controller again every time the user opens the app. Ideally, you want your app to send the user to the authentication screens.
With the programming language and IDE that we will show you here, you can do this much more easily. In this article, we will introduce you to the Swift 4 programming language. We will first give you a few hints regarding this new programming language and then explain the easiest way to change your initial view controller.
What Is Swift 4?
Swift 4 is a programming language used for OS X and iOS app development. It is created by Apple Inc.
What makes this programming language so special is the fact that it has incorporated the best programming concepts from languages such as C, C++, and C#. All of this is available in Swift’s libraries without the common C compatibility constraints.
Another reason why this programming language is being used for most of today’s iOS apps is the fact that it uses Objective C system’s runtime. This enables programs that were written in Swift 4 to be run across many different platforms, such as OS X 10.8, iOS 6, etc.
The Swift 4 syntax is very similar to Objective C’s syntax. As such, if you know your way around Objective C (C++, C sharp), you will learn Swift 4 without difficulties.


What IDEs Should You Use for Programming in Swift 4?
Judging by the comments from experienced developers, the Xcode seems to be the “fan favorite” when it comes to writing in Swift 4. Also, the Xcode IDE is excellent for the purpose of this article as it has features that allow you to easily tweak the app’s configuration.
Other IDEs either don’t have the same features or they aren’t that easy to learn.
The Xcode IDE is quite flexible, advanced, and very easy to use. This environment allows you to create powerful iPad, iPhone, Mac, Apple TV, and Apple Watch applications. You can download this IDE here.
Changing the Initial View Controller in Xcode
With all the key ingredients in place (Swift 4 and Xcode), it is time to show you how to change your app’s initial view controller.
We will do this by creating a new project in Xcode from scratch, so you will also learn how to set up the environment. Of course, if you have already created a project, you can still follow the tutorial.
There are two suggested ways how to do it, so try the one you find easiest and see if it works for your app. We’ll start with the first.
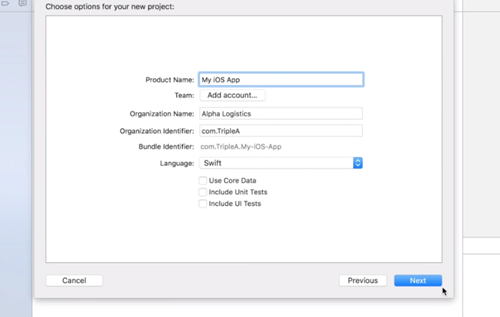
Here’s how you should create your new Xcode project:
- Open your Xcode IDE and enter the Create a New Project configuration.
- Select the Single View app from the Choose a Template for Your New Project window.

- Enter your project’s name in the Product Name field and click Next.

- Choose the location where you will store your project files.
- Click Create.

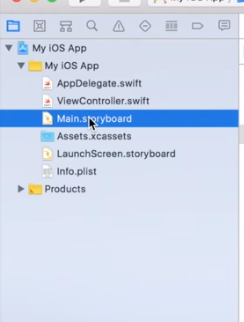
After you’ve done the last step, Xcode will display the initial files that have been created automatically. These files will be created on the left side of your screen (if you’re using IDE’s default configuration).
You should have AppDelegate.swift, ViewController.swift, Main.storyboard, and assets on the left. Note that ViewController.swift was also automatically created. That’s your initial view controller that will be displayed first when you run the app.
Now let’s create a new view controller and set it as the initial one.
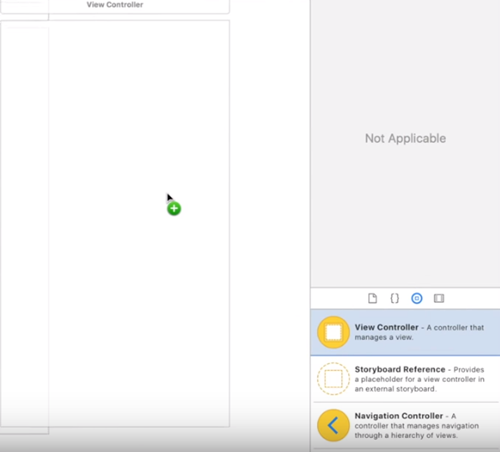
- Click on the Main.storyboard file. You will be able to see how your Initial View Controller currently looks like on the left side of your screen.

- Simply drag the View Controller to the screen to create a new one; this option is located on the bottom-right side of the screen. After you’ve clicked and dragged it on the screen, you will notice that an additional View Controller has appeared next to the original one.

- Click on the first (original) View Controller’s top label that says View Controller. After clicking on this label, three options will appear.

- Select the first option from the left, which will show you that View Controller’s configuration options.
- Click on the arrow icon located in the right section of the screen.
- Toggle off the Is Initial View Controller checkbox.


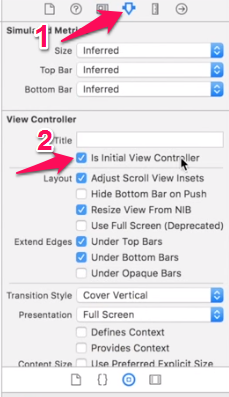
By unchecking the Is Initial View Controller checkbox, you’ll ensure that the original View Controller won’t appear when you run the app.
Do the same steps for the View Controller that you have created, only this time check the Is Initial View Controller checkbox. And voila! You have set your additional View Controller as the initial one in Xcode.
Programmatically Changing the Initial View Controller
In case you don’t have the Initial View Controller in your existing project’s storyboard, you can still make changes. However, this method is a bit challenging and does require some previous Swift 4 programming knowledge.
Before we begin, you have to make sure that all your controllers have their own Storyboard IDs. You should also check if some controllers have the Is Initial View Controller checked in their settings.
After you’ve done that, do the following:
- Clear the value of your program’s Main Storyboard File Base Name. This is located in your app’s settings. Navigate to its Info tab.
- Clear the value of Main Interface in your app’s General tab.
- In your app’s delegate’s application:didFinishLaunchingWithOptions: method: create the new Initial View Controller.
We will use Sapan Diwakar’s code as an example:
self.window = [[UIWindow alloc] initWithFrame:UIScreen.mainScreen.bounds];
UIStoryboard *storyboard = [UIStoryboard storyboardWithName:@”Main” bundle:nil];
if ([self isUserLoggedIn]) {
// Show the dashboard
self.window.rootViewController = [storyboard instantiateViewControllerWithIdentifier:@”SDDashboardViewController”];
} else {
// Login
self.window.rootViewController = [storyboard instantiateViewControllerWithIdentifier:@”SDLoginViewController”];
}
[self.window makeKeyAndVisible];
An alternative way would be to work through the UINavigationController. To try this alternative method, instantiate the correct view controller somewhere in application:didFinishLaunchingWithOptions: (delegate) and push it to the UINavigationController.
Here’s how it can be done:
var navigationController: UINavigationController? = (self.window?.rootViewController as? UINavigationController)
var storyboard = UIStoryboard(name: “Main”, bundle: nil)
if self.isUserLoggedIn() {
// Show the dashboard
navigationController?.pushViewController(storyboard.instantiateViewController(withIdentifier: “SDDashboardViewController”), animated: false)
}
else {
// Login
navigationController?.pushViewController(storyboard.instantiateViewController(withIdentifier: “SDLoginViewController”), animated: false)
}
Enjoy Your Mobile App Development Adventure
Hopefully, at least one of the methods we have shown you here works for your app. Now you can break from the dead end and continue developing your mobile app.
Of course, there are many other ways to solve the same issue using programming. Do you know of a good alternative? If you do, share it with us in the comments section below.