


These Files Might Be Harmful to Your Computer – How to Disable

It seems like newer versions of Windows cater more to less experienced computer users. From Windows Vista all the way to Windows 10, there has been a big increase in warning messages regarding anything that Windows detects as unsafe even in the slightest. This has progressed all the way to, most notably, transferring files within your own home network.
Due to internet settings, transferring files from one network to another can cause this annoying message to appear. Keep reading to see how to disable it, as well as how to find a computer’s Internet Protocol (IP) address, which you’ll need to adjust these settings properly.
Checking the IP Address
At some point, you’ll have to enter the IP address of the computer on your network that you want to declare “safe.” Here’s how to find it:
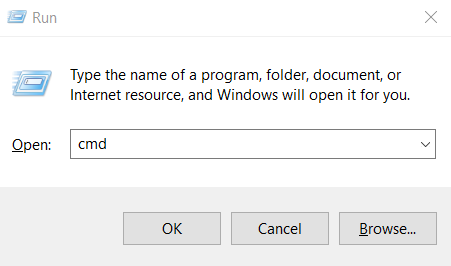
- Open the Run program by right-clicking on the “Start” button (in Windows 8, 8.1, and 10). Another way of doing this in all recent Windows versions is by pressing the “Windows” key and “R” on your keyboard.
- Type “cmd” and press Enter or click on the “OK” button. This will open Command Prompt.

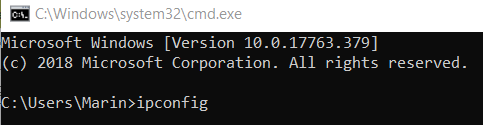
- To see your IP address, type “ipconfig” while in Command Prompt and hit Enter. This shows the connection info, with “IPv4 Address” near the bottom.

- If you tend to double-check everything, write down your IP address. You’ll only need the first three numbers (two three-digit numbers followed by a one-digit number).


Modifying Internet Settings
As we’ve mentioned already, you will need to change certain internet settings to disable this warning message. You can choose to disable it for files that are coming from all other or certain computers on the network. No matter your decision, here’s how to achieve this:
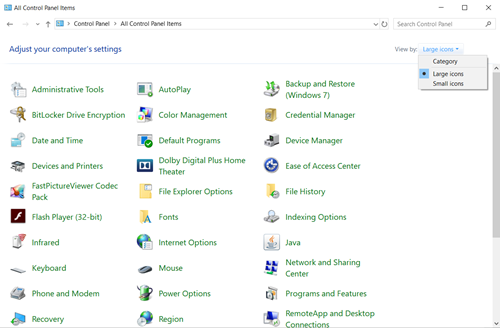
- Head to Control Panel. To open it, what you can do on all recent versions of Windows is open File Explorer (or Windows Explorer) and start typing “Control Panel” in the Address bar. The Control Panel suggestion will likely appear before you’re even done typing, so select it by clicking on it.
Note: In Windows 7, you can access it even easier by clicking on the “Start” button and clicking on it in Start Menu. - In Control Panel, see if you’re using “Category view” by checking that window’s top-right corner. If you are, select the “Network and Internet” category, then open Internet Options from there. If the “View by” option is set to “Large icons” or “Small icons,” Internet Options will be directly accessible to you.

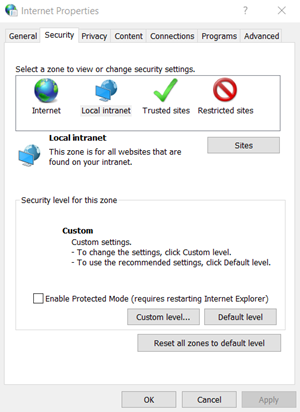
- After opening Internet Options, the “Internet Properties” window will pop up. Go from the General to the Security tab.

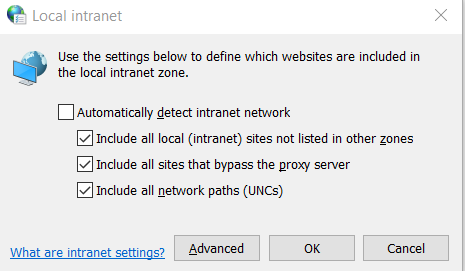
- The first option you’ll encounter here lets you change the security settings for websites for a certain part of your network. Click on “Local intranet,” then click on the “Sites” button.
- A “Local intranet” window will pop up. However, you do not need to change anything here, so just click on the “Advanced” button to go a step further.

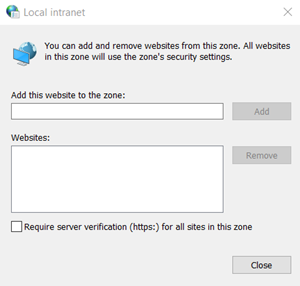
- Another “Local intranet” window will appear. This one prompts you to enter websites to add to your local intranet zone, meaning Windows will mark them as safe. Here’s where you should type in your IP address.
 Note: Fortunately, you can also use a wildcard, which means that you should use an asterisk (*) for the final number of an IP address. This will include all of the computers on your local network, meaning you don’t have to type the IP addresses one by one.
 - Click on the “Add” button to add the website (or IP address) to the zone.
- Click on the “Close” button to close this window. Since this is everything you needed to do, click on the “OK” button on both the first “Local intranet” and “Internet Properties” windows to save the changes.
 Note: Fortunately, you can also use a wildcard, which means that you should use an asterisk (*) for the final number of an IP address. This will include all of the computers on your local network, meaning you don’t have to type the IP addresses one by one.
Changing the User Account Controls
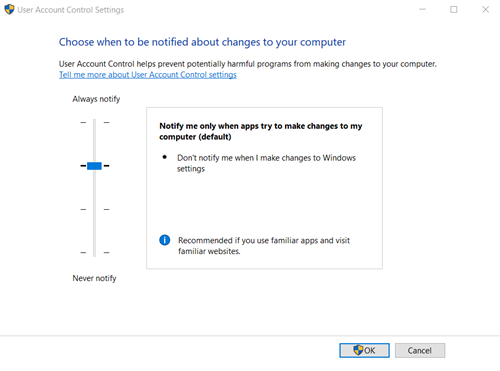
Another warning message very similar to this one is related to “User Account Control” (UAC). Windows uses it to ask you if you’re sure you want to let a certain program make changes to your computer. Since this is another warning message that’s not overly relevant, you can change it by doing the following:
- Open Control Panel.
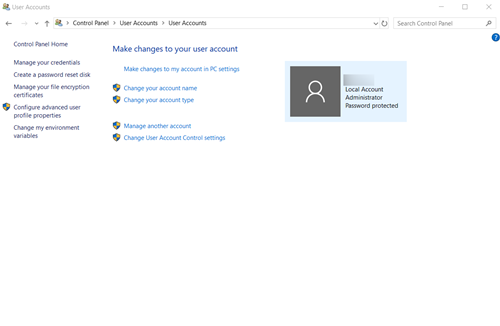
- You’re looking for User Accounts within Control Panel. If you’re using “Category view,” you’ll need to enter “User Accounts” twice.

- Click on the “Change User Account Control settings” button.
- In the following menu, you’ll be greeted with a vertical slider. Move it all the way down to prevent all UAC warnings from appearing, or all the way up to increase their frequency.
 Note: Disable these warnings only if you’re an advanced computer user or if these warnings are slowing your computer down to an unacceptable level. You can also move the slider one step down for the latter.
 Note: Disable these warnings only if you’re an advanced computer user or if these warnings are slowing your computer down to an unacceptable level. You can also move the slider one step down for the latter.
Mind Your Security
Windows is looking to be more secure for and approachable to less experienced users, so many people might find its warning messages irrelevant. If you’re among them, consider taking these steps to make these messages harder to trigger.
Have you ever encountered these warning messages at the most inopportune moments? Let us know about your experience in the comments below, as well as if you need help with anything else Windows related.


