


How To Fix ‘Fixboot access is denied’ Errors in Windows 10
Fixboot access denied errors in Windows 10 are a real pain. They usually come after you see a blue screen with ‘INACCESSIBLE_BOOT_DEVICE’ as the message. In the majority of cases this can be fixed but it does take time and a little work. This tutorial is going to walk you through fixing ‘Fixboot access is denied’ errors in Windows 10.
Oftentimes you will see ‘INACCESSIBLE_BOOT_DEVICE’ after a failed upgrade to Windows 10, a failed major Windows Update or if you had to force power off your computer instead of shutting it down gracefully. If Windows was writing to the disk while you shut down it can corrupt files, giving you that message.
One way of fixing ‘INACCESSIBLE_BOOT_DEVICE’ errors is by using the command ‘bootrec /fixboot’. If this doesn’t work, it in turn will give you ‘access is denied’ errors. While the error looks serious and your computer will not boot into Windows, none of these errors are terminal. This is a software error and not a hardware error. The worst case scenario is that we will have to reinstall Windows. That is unlikely though if you follow the steps I outline below.
Fix ‘Fixboot access is denied’ errors in Windows 10
As mentioned, the ‘Fixboot access is denied’ error is a response to a fix for ‘INACCESSIBLE_BOOT_DEVICE’. To fix one, you have to fix the other, which we are going to do.
First we need to download the Media Creation Tool from Microsoft and create a bootable USB drive. If you depend on your computer, it is a good idea to create one of these ahead of time and keep it close for when you need it. You will need a USB drive of at least 4GB but more is better. If you don’t do this in advance, you will need access to another computer to perform this task.
- Download the Media Creation Tool from Microsoft.
- Select MediaCreationTool.exe and start the tool.
- Accept the agreement and insert your USB drive into your computer.
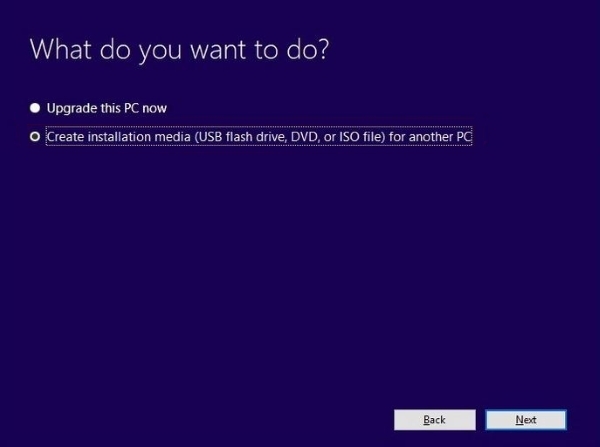
- Select Create installation media (USB flash drive, DVD, or ISO file) for another PC and hit Next.
- Select Use the recommended options for this PC or set your own, then hit Next.
- Select USB flash drive and hit Next.
- Select your drive from the list in the next screen then Next.
- Let the process complete.
Creating bootable media takes a little while but the Media Creation Tool takes care of everything for you. It will download the Windows 10 ISO, install it along with boot files and make sure your computer can boot from it.
Once complete, leave the USB drive inserted into your computer and reboot. If you have changed your BIOS or UEFI to only use the hard drive, you will need to go into the settings at boot to add the USB drive. Otherwise, when you see the option to boot from USB on reboot, press the space bar to do just that.
Then:
- From the initial Windows screen, select Repair your computer instead of Install.
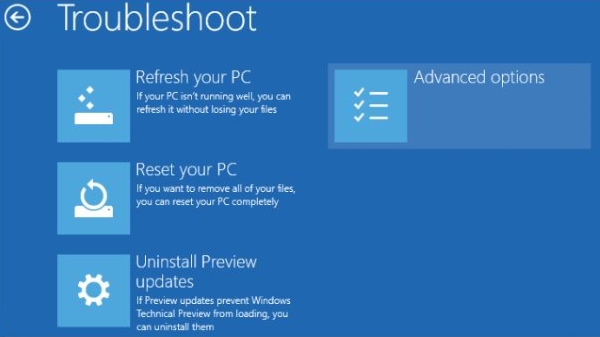
- Select Troubleshoot and then Advanced Options.
- Select Startup repair.
This is the Windows automated repair process that may be able to fix the error without having to do anything else. Sometimes it is a bit hit and miss but is definitely worth trying before we do more in-depth fixing. The process takes time and will keep you updated. It will likely reboot. When it does, do not press space bar to boot from USB. Allow it to boot into Windows so we can see if it worked or not.
Startup repair will sometimes tell you straight away that it couldn’t fix the error. Sometimes it thinks it has but actually hasn’t. In that case, either reboot back into the Windows boot media or remain where you are if it simply errored.
Then:
- From bootable Windows screen, select Repair your computer instead of Install.
- Select Troubleshoot and then Command Prompt.
- Type ‘chkdsk /r c:’ and hit Enter. This assumes Windows is installed on your C: drive. Change it if you need to.
- Allow the process to complete.
Again, it may show errors, it may not. Reboot and retest without booting from the USB media to see if it worked. If not, try the below.
- From the Install Windows screen, select Repair your computer instead of Install.
- Select Troubleshoot and then Command Prompt.
- Type ‘bootrec /fixboot’ and hit Enter.
- Allow the process to complete.
It is here that you may see the original ‘Access is denied’ error. If you do, we need to play with Diskpart. The method has changed since Windows 10 version 1709 so follow the below exactly if your version is later than that.
- From the Install Windows screen, select Repair your computer instead of Install.
- Select Troubleshoot and then Command Prompt.
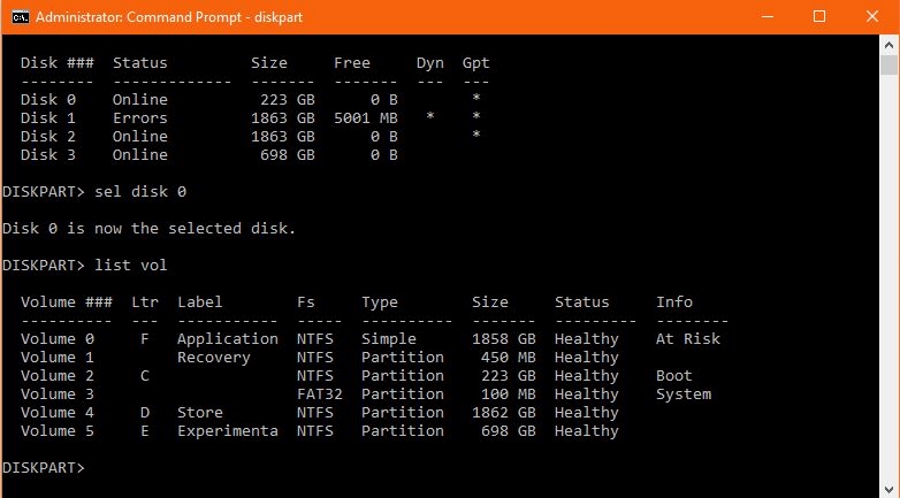
- Type ‘diskpart’ and hit Enter.
- Type ‘list disk’ and hit Enter. Find the number of your boot disk, usually 0.
- Type ‘Sel disk 0’ and hit Enter to select the boot drive.
- Type ‘List vol’ to list the volume with the bootable EFI partition. Get the number of that partition.
- Type ‘Sel vol 1’ and hit Enter. Change ‘1’ for whatever volume number your EFI partition is.
- Type ‘assign letter=Z:’ and hit Enter.
- Type ‘exit’ and hit Enter.
- Type ‘Z:’ and hit Enter.
- Type ‘format Z: /FS:FAT32’ and hit Enter.
- Type ‘bcdboot C:\windows /s Z: /f UEFI’ and hit Enter.
This is a serious piece of work that essentially renames the boot drive to Z, formats that drive to FAT32 and then recreates the boot record from Z to C:, therefore enabling Windows to boot from that drive again. This should work in all but the most extreme cases of ‘Fixboot access is denied’ errors in Windows 10.
Your only option if none of these steps work is a reinstall of Windows 10. If diskpart didn’t work then the boot record is irreparably damaged and will never boot properly. Try using the ‘save my files and folders’ option in the installation menu to see if you can save your stuff. Only perform a full reinstall if that doesn’t work.
Fixing ‘Fixboot access is denied’ errors in Windows 10 is a ton of work but well worth the effort. Your only alternative otherwise is a reinstallation of Windows which is even more of a pain!


5 thoughts on “How To Fix ‘Fixboot access is denied’ Errors in Windows 10”
Thanks for the article !