


Protect Your PC Against Malware With Windows 10 Memory Integrity Protection

Security is a huge concern these days, especially after widespread attacks like WannaCry and deep exploits like Spectre and Meltdown. There’s a lot you can do to protect yourself against further ransomware attacks similar to WannaCry, as well as everyday protection against malware and harmful viruses. That’s great and all, but the typical everyday protections we employ against things like this don’t work well against more sophisticated attacks.
That’s where Memory Integrity Protection in the new Core Isolation features come into play. By turning this on and enabling Memory Integrity, you turn on a virtualization-based security feature that will add hardened security against some of the more complex attacks out there.
If you follow along below, we’ll show you how to enable Core Isolation and Memory Integrity, and even detail how this all works.
What is Memory Integrity?
The problem that we are coming across much more frequently these days are kernel-level exploits that attempt to execute malware without running into security fences or sandboxes. That’s largely how WannaCry and Petya ransomware spread so quickly on a global level.
Now, recently Microsoft has brought Virtualization-based Security (VBS) to consumer versions of Windows 10, which in a nutshell uses hardware virtualization features to not only create, but also set aside and isolate a portion of memory that is separate from the Windows 10 operating system itself. It’s basically a virtual secure mode where the kernel checks or verifies the integrity of drivers and binaries before being executed. This means that unsigned system files or drivers cannot be loaded into the system memory and be executed, which would completely avoid another WannaCry or Petya from happening.
This new virtualization security system isn’t foolproof, but it does greatly limit the chances of something happening again, and if a bad piece of ransomware or other malware came into being, what it could do would be severely limited. Here’s how Microsoft puts it:
“VBS uses the Windows hypervisor to create this virtual secure mode, and to enforce restrictions which protect vital system and operating system resources, or to protect security assets such as authenticated user credentials. With the increased protections offered by VBS, even if malware gains access to the OS kernel the possible exploits can be greatly limited and contained, because the hypervisor can prevent the malware from executing code or accessing platform secrets.”
All in all, it’s worth enabling this type of security on your Windows 10 PC, whether you have a desktop, laptop or a Surface Book. If something like WannaCry or Petya were to ever happen again, this type of kernel-level security will save you time and money by not letting the virus absolutely destroy your Windows 10 installation and all of the personal files in it.
If you want to find out how to enable Memory Integrity for yourself, be sure to follow along.
How to enable Memory Integrity
Enabling Memory Integrity within Windows 10 is quite easy; however, there are a couple of requirements in order to use it. First, the processor in your desktop, laptop or other Windows 10 device must support virtualization. In addition to that, virtualization must be enabled in your BIOS or UEFI.
Typically, you can access BIOS or UEFI upon boot up with a hotkey. This hotkey is usually F2, but can vary depending on the brand of computer you have. For example, some ASUS laptops will have the hotkey as F10. To access BIOS, you simply restart your system and press the hotkey on boot up (you usually only have a couple second window to do this, so you have to be fast).
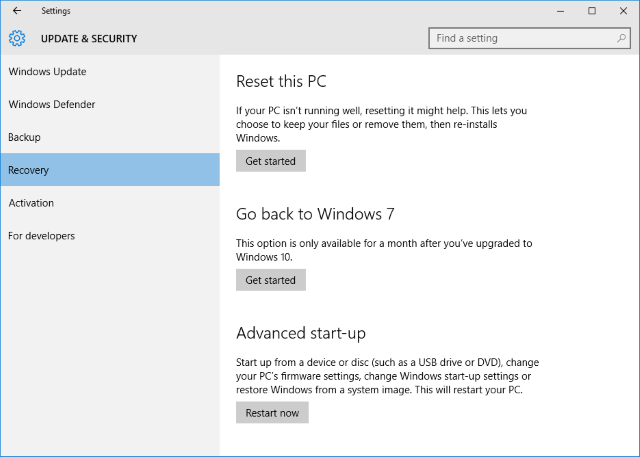
If you want to access your BIOS or UEFI from inside Windows 10, you can do that to. Just head into the Settings app, and go to Update & Security > Recovery. Under “Advanced Startup” press Restart Now.
This will open up a blue screen with a couple of options. Here, click on the Troubleshoot icon, then Advanced Options, and then click on UEFI Firmware Settings, and finally, the Restart button that follows. This should take you into your BIOS or UEFI firmware.
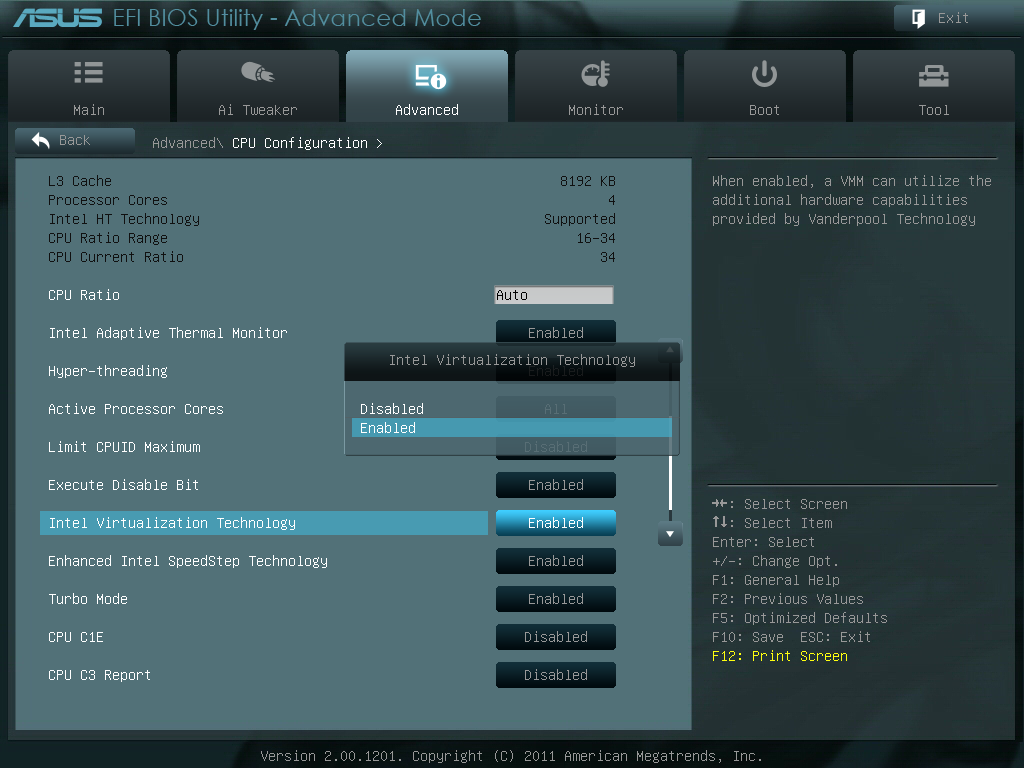
Every manufacturer has there virtualization support options in the BIOS/UEFI located in a different section. In a lot of ASUS laptops, it’ll be under the “Advanced” settings. You might have to do some digging to find it for your specific computer, but it should look something like the image above. Just make sure it’s enabled.
Do keep in mind that by enabling virtualization in your BIOS/UEFI, there are a bunch of built-in Windows 10 protections turned on by default, such as Hypervisor Protected Code Integrity (HVCI) — you can read a whole lot more about all of this over on Microsoft’s own website.
Once virtualization is enabled, we can finally enabled Memory Integrity in Windows 10. Make sure you save your BIOS/UEFI settings and reboot your computer.
Once booted into Windows 10, open the Windows Defender Security Center. This is fairly easy to access — you can simply search for the term in the Search bar in the Windows 10 taskbar. Once the application is opened, select the Device Security tab, and under Core Isolation select the Core Isolation Details link.
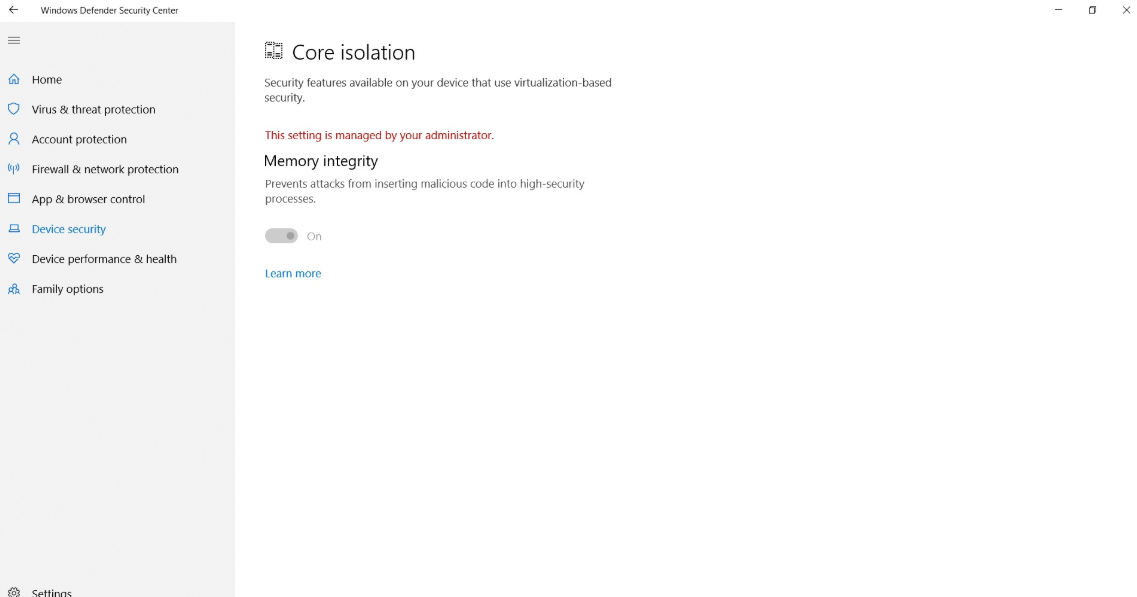
This will take you into Core Isolation settings. Once you are here, simply click on the Memory Integrity slider so it is in the “On” position.
If the Setting is grayed out, it means that it can only be changed by an Administrator. In this case, with administrator privileges, we need to go into the Registry Editor to turn Memory Integrity off. Keep in mind that before accessing the Registry Editor, make a full backup of your PC (read our guide here); messing with values in the Registry Editor can cause irreversible damage to your current instance of Windows 10.
If you follow our steps exactly, you shouldn’t run into any problems in the Registry, as we’re simply turning a feature off in a manual sort of way. Still, make sure to do a full system backup, as you don’t want to even risk losing any of your person files if your Windows 10 installation were to break for some strange reason.
To access the Registry, open up Command Prompt and type regedit. This will open the Registry. You’ll need to follow this path to get into Memory Integrity in Core Isolation:
HKEY_LOCAL_MACHINESYSTEMCurrentControlSetControlDeviceGuardScenariosHypervisorEnforcedCodeIntegrity
Inside this path, double-click on the Enabled key. Set its value to 0, and click OK. Restart your computer, and the changes should automatically be applied. Memory Integrity should be disabled, and you should be able to use the application you were having trouble with without any problem. If you ever want to re-enable Memory Integrity, just follow the Windows Defender Security Center steps above. You can also enable it through the Registry, by instead turning that value we just turned to 1.
Once that is done, reboot your PC. Congratulations, your PC is now using hardened security against sophisticated attacks!
Problems with Memory Integrity in Core Isolation
Now, some problems can arise with this setting turned on. It’s nothing major at the system-level, but you may come across some compatibility issues with some applications. Certain applications may appear buggy and slow, and other applications might not launch at all. You might even get an error message. However, don’t be too alarmed — it’s simply because applications haven’t added full capability to support this feature.
So, to use the applications that you’re having trouble with, you’ll need to turn Memory Integrity off. Simply repeat the steps above — just the Windows Defender Security Center steps since the BIOS doesn’t need to be changed — but this time, turn the Memory Integrity slider to the “Off” position.
Closing
And that’s all there is to enabled Memory Integrity Protection. It’s certainly quite a process to setup and enable, but once it’s enabled, you have extra security that you can depend on. Compatibility issues with other apps can arise by turning it on, but it’s easily turned off if you don’t have to pop into the Registry to manually turn Memory Integrity off.
Overall, with Memory Integrity Protection turned on, you shouldn’t have to be as concerned anymore about sophisticated attacks like WannaCry or Petya hitting your PC. Memory Integrity Protection makes it very hard for remote code execution to happen, so paired with your traditional anti-malware software, you should be protected against most common and rare attacks combined.
Have a question, comment or need assistance? Be sure to leave a comments in the comments section below or join us over on the PCMech Forums, where we have plenty of knowledgeable people that can help you solve your PC problem or question.


