How To Use DeSmuME Microphone(including HotKey)

Back in the day, Nintendo DS was all the craze. It had super cool games and was far more advanced than its predecessor, the popular Game Boy Advance. The mighty little handheld was available in a number of versions, of which the 3DS was notable for its ability to display nifty stereoscopic 3D effects. Also, some of them come with built-in microphones.
As an awesome emulator, DeSmuME supports the mic function, too. Let’s see how to get it up and running on your computer.
DeSmuME and Microphones
DeSmuME is one of the most popular emulators for Nintendo DS. It is available on a wide range of platforms, including Windows, Linux, and Mac. Along with the standard capabilities of a physical DS, DeSmuME also allows players to save at any point and record their games.
Along with all the cool save and record features, DeSmuME emulator also includes microphone support. This allows players to revisit their favorite games that utilized the handheld’s built-in microphone, thus making the DS experience as close as possible to actually playing on the console.
If you’d like to play old DS games that require the microphone, you can either connect a physical mic to your computer or get DeSmuME to emulate it. Let’s investigate both options.
Connect Your Microphone
You connect a microphone to your computer and then to the emulator. This is the easiest way to play games that need voice input.
- Launch your browser and go to DeSmuME’s official page.
- Click on the download page link for the latest version. Older versions might not support the microphone feature, so be sure to get the 0.9.11 version.
- The site will redirect you to the download page. DeSmuME is available in 32 and 64-bit versions for Windows. Also available are a 32-bit version for old Windows systems and 32, 64-bit, and PowerPC versions for Mac OS.
- You will be redirected to the actual page where the file is located. Wait for 5 seconds and the download should start automatically. If it doesn’t or if you get the error message (happened to us), go back to desmume.org and try again
- At the completion of the download, launch the setup file and install the emulator.
- Connect your microphone to the computer and configure it.
- Launch DeSmuME.
- Hit the Config tab in the Menu bar.
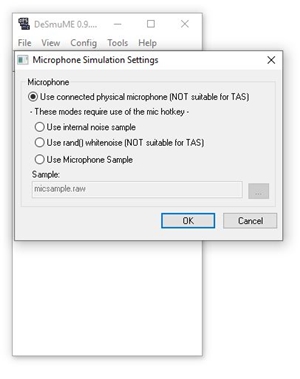
- Click on Microphone Settings in the drop-down menu.
- Select the option box next to Use connected physical microphone (NOT suitable for TAS).

- Hit the OK button to confirm.
- Go back to the main window of the emulator. Start up a game that needs the microphone to test if it works.
If it doesn’t work the first time, turn off the emulator and unplug the mic. Plug the microphone back in and start up the emulator. Repeat steps 7 to 11.


NOTE: DeSmuME only works with files that end in .ds and .nds extensions. Game files can be “zipped.”
Use Keyboard Hotkey
DeSmuME developers have taken into account users that don’t have a physical microphone around or any desire to buy one. If you’re one of them, you can choose one of three emulation options. To emulate the microphone using DeSmuME, follow these steps.
- Launch DeSmuME on your computer.
- Hit the Config button in the main menu.
- Click on the Microphone Configuration option in the drop-down menu.
- Choose one of the three available options under “These modes require the use of the mic hotkey section.” Pick one of the three available options and hit OK.
 If you pick the last option, Use Microphone Sample, click on the three dots next to the drop-down menu and manually select the audio file that will play when you press the microphone hotkey. However, you can also use the default noise sample (first option) or download one from the internet. Ask around inactive DeSmuME forums. Alternatively, you can record one using Sound Forge or another recording suite.
 - Now, click on the Config button once more.
- Select the Hotkey Config option from the drop-down menu.
- When the Hotkey Configuration window opens, click on the text field next to the Microphone label.
- Press the key for use as the microphone hotkey.

- Press OK to confirm your choice.
 If you pick the last option, Use Microphone Sample, click on the three dots next to the drop-down menu and manually select the audio file that will play when you press the microphone hotkey. However, you can also use the default noise sample (first option) or download one from the internet. Ask around inactive DeSmuME forums. Alternatively, you can record one using Sound Forge or another recording suite.
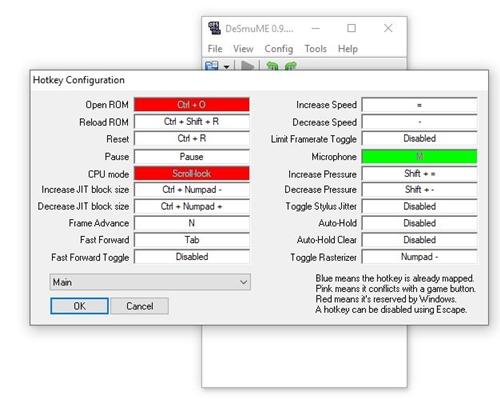
Return to the main window and click on the File button. Click the Open ROM button and select a game that supports voice inputs to test the functionality of the emulated mic. If it doesn’t work, restart the emulator and repeat steps 2 to 9.
Let There Be Sound
DeSmuME’s built-in microphone support lets you enjoy classics like Mario & Luigi RPG 3 Bowser’s Inside Story, Legend of Zelda – Spirit Tracks, and Pokemon Diamond & Pearl.
What have been your experiences with DeSmuME and games that require mic? Is there anything that you’d like to know about it? Let us know in the comments below.