


How To Install Linux on a Chromebook – A Complete Guide
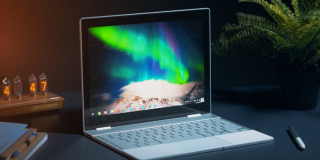
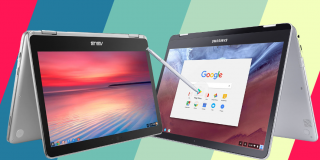
It’s no secret that Chromebooks are a great option for users looking to find a cheap laptop able to do the majority of what laptops are used for: browsing Facebook, watching Netflix, reading news, and looking at photos of dogs. But ChromeOS isn’t perfect for every user, or even every use case. Occasionally, you might find yourself in a position where running a desktop app is the only way to get something done, with no web app alternative available. Maybe you want to try playing desktop games on your Chromebook, or you need a full Office replacement suite with more functionality than Google Docs. No matter the reason, installing Linux onto your Chromebook might actually be a great idea.
But wait—what if you’ve never used Linux before? Does the idea of a command line interface frighten you? It’s true that installing Linux isn’t as simple as installing another application. Thankfully, ChromeOS is built on top of Linux, which makes things a bit simpler than it might’ve otherwise been. Even if you have no experience installing Linux on a device, following this guide means you’ll be up and running in about an hour. And the best part? You can switch back and forth between ChromeOS and Linux instantaneously with a keyboard shortcut.
So what are you waiting for? Read on for our in-depth guide, and leave a comment below if you need any additional help.
The Basics of Linux: What you need to know
Linux is an open-source alternative to desktop operating systems like Windows and MacOS. It’s available in several different distributions, or “distros.” If you’ve ever researched distros before, you’ll understand that Linux is a series of forks. The distro we’ll be using here today is called Debian, and it’s known for being one of the earliest distributions. Debian is hugely popular online, maintained by a large volunteer community, and it powers several popular varieties of Linux, including our choice: Ubuntu.
Okay, technically, we aren’t using Ubuntu either. We’ll be using “Crouton,” a project developed by a Google engineer. Crouton actually stands for Chromium OS Universal Chroot Environment, which is a bunch of technical jargon boiled down to, it’s a fork of Ubuntu made to run next to ChromeOS. Crouton uses Xfce’s desktop interface, a basic but certainly usable desktop UI.
So, I’ll be referring to our build of Linux as Crouton throughout the guide. If you see Xfce mentioned anywhere, remember this is also referring to Crouton. And again, if you have any questions, feel free to ask us below. Overall, however, just remember that this is a pretty simple guide. Even if it looks scary at times, just remember to follow the guide closely and you’ll be done in less than an hour.
Before we begin
We’re going to be diving into ChromeOS’s command line interface to do this. It might seem a bit scary or daunting if you’ve never used a command line before, but just type (or copy and paste) exactly what is written below. Watch for spaces and punctuation. Command lines will typically give you an error if you give an incorrect command, but it is possible to brick your device with the right command, so try to be careful and fill out the guide exactly as it is below. If you’re nervous, don’t worry: you’ll be fine.
Also, this guide is going to require placing your Chromebook into developer mode. This lowers the security of your Chromebook a bit, but more importantly, it completely resets your Chromebook, wiping it of user data. Chromebooks are pretty low in storage anyway, and it’s likely most of your data is saved in Google Drive, but check your downloads folder to ensure you aren’t deleting anything important. You will have to reenter your WiFi and Google account information once during this setup, so make sure you have that info on hand.
Okay, let’s do this.

Placing your Chromebook in Developer Mode
First things first: to install Crouton, we’ll need to place your Chromebook in developer mode. This is pretty easy, so don’t stress out too much just yet. A couple keyboard commands are all you’ll need. Again, this will delete your user data, so make sure you back up and save any files . Once you’ve ensured there aren’t any important files worth keeping on your Chromebook, you can begin by following the steps below. Putting your Chromebook in developer mode just requires hitting some hotkey combinations, so don’t stress too much just yet. The real work is yet to come. Open up your Chromebook, make sure it’s on and unlocked, and start the steps below.
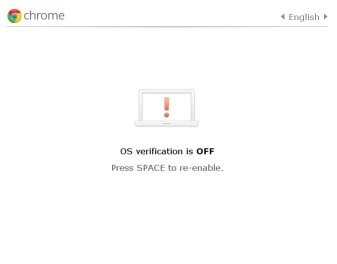
Hold ESC and Refresh down simultaneously. While holding them, press and release your laptop’s power button, immediately rebooting your laptop. Then you can let go of your keys. A white screen with a yellow exclamation point is going to appear, along with a line of text informing you that Chrome OS is missing or damaged. Don’t worry—you haven’t screwed up or damaged anything. Press CTRL and D at the same time to continue into developer mode. You’ll see a message prompting you to turn OS verification off. Press enter to continue, and sit back while your Chromebook does the rest of the work. This takes some time, and your machine might reboot once or twice (mine rebooted twice). Overall, it takes about five to ten minutes to finish the process. Once you’ve been returned to the “OS Verification is Off” display, you’re good to go. Take a pause, because after a few moments, your machine will reboot back into a fresh install of ChromeOS.
Since you’ve basically factory restored your laptop, you’ll have to reenter your WiFi connection information and your Gmail account. This may take a few moments as your computer reinstalls any plugins or web apps you previously had available. Once that’s done, go ahead and move onto the next step.
Installing Crouton/Linux
This is the big part, but if you’ve gotten this far, you’re already halfway done. If you’ve used a command prompt interface before, you’re going to be right at home here. If you haven’t though, this really isn’t difficult to accomplish. Follow the steps accurately and thoroughly and you’ll do fine.
Start by heading on over to Crouton’s GitHub repository. If you aren’t familiar with GitHub, just think of it as a storage hub for all sorts of Git (or executable programs) offered by developers. Once you’re there, you’ll see a goo.gl link next to the “Chromium OS” headline. Click it, and a file called Crouton will be downloaded into your Downloads folder.
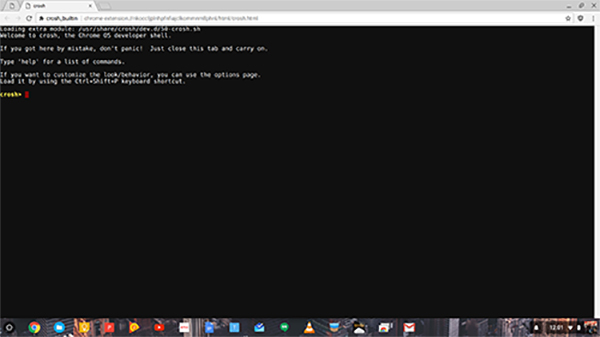
Now here comes the fun: open up a ChromeOS developer shell by pressing CTRL, ALT and T at the same time. This is ChromeOS’s built-in command prompt. Your bottom-line begins with the word “crosh>” in yellow font. Type “shell” next to this—your red cursor should already next to crosh>, and hit enter. The command prompt will load your shell commands; you’ll know you’ve done this right when it reads “chronos@localhost / $”. You’ve also just entered your first command into command prompt—nice job!
Okay, so from here, the commands get a bit more specific. If you want, you can copy and paste these into your command prompt, or you can type them out. Keyboard shortcuts don’t function in command prompt, so if you do copy and paste, you’ll have to right-click>Paste to paste your clipboard. This first command is only for if you’re using a Chromebook without a touchscreen, and follows after the dollar sign ($):
sudo sh ~/Downloads/crouton -e -t xfce
If you are using a touchscreen, use the following command.
sudo sh ~/Downloads/crouton -e -t touch,xfce
Whichever command you’re using, hit enter after you type or paste it. The Crouton installer will be downloaded onto your device. Because security on your device is important, you’ll have to enter a password and a passphrase (essentially a longer password) into the command line when prompted. If you’ve never entered a password into a command prompt before, understand that you won’t be able to see what you’re typing as you’re typing it. Do be careful not to make any mistakes or typos while typing either your password or passphrase. You’ll have to reenter each a second time, so as long as you don’t make the same mistake twice, you should be good to go.
Once you’re done entering your password, Crouton’s installation will take over. While I don’t recommend you walk away from your laptop, as you’ll want to make sure the Chromebook doesn’t go to sleep, you’re pretty much done from here. I told you it was easy! A time will come when the command prompt asks you to select a username and password for your Linux account. Go ahead and set these as whatever you’d like; I recommend using your name and a password you can remember.
You’ll know installation is complete when the command prompt returns control over to you. You have one more prompt to enter, which will boot up Ubuntu onto your machine, and you’re done. Make sure your terminal still reads “chronos@localhost / $”; if it doesn’t type “shell” and hit enter. Then, go ahead and type or, if you’d like, copy and paste the following:
sudo startxfce4
This is an important command to remember, as you’ll need to use it to boot up Ubuntu every time your Chromebook is shut down. An easy way to remember: sudo is a fairly standard default syntax when working in command prompts, while start informs the machine to boot a program, and xfce4 is the actual name of the Ubuntu fork we’ve installed through Crouton. So, sudo (telling your machine to listen) start (boot a program) xfce4 (name of program). Simple enough, though don’t worry if it takes a few go-arounds to remember the phrase by memory.
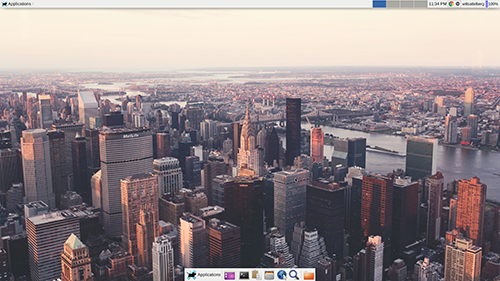
Once you’ve submitted the above and hit enter, Xfce will boot. Log in with your username and password you entered during the final moments of Crouton’s installation process, and you’ll have a shiny new Linux desktop sitting in front of you, ready to be used and customized to your needs.
Tips for Using Linux
Okay, so you have Crouton and Xfce (our branch of Linux) up and running on your computer. If you’ve never used Linux before, diving into a strange new operating system might be a bit of a daunting task, but don’t worry—it’s actually pretty easy to learn. At the bottom of the display, you’ll find a dock with some basic settings and applications, including a terminal shortcut and a link to Xfce’s default browser. At the top is your taskbar; this taskbar functions somewhere in between Windows and MacOS in terms of utility. On the far left of the taskbar, you have a drop down menu for your applications, similar to the Start menu on Windows. On your desktop itself, you have a bunch of links to specific drives and partitions in your Chromebook. Most of these are going to be grayed out and unable to be opened; if you want to turn these off, there’s an option to do so under settings, but we’ll get there in a bit.
Let’s first start with that applications menu. You’ll find plenty of built-in, rudimentary apps available for usage, including a terminal, a file manager, a mail app, and a browser. Open the browser and you’ll find it’s not nearly as usable as something like Chrome. Good news: Chrome is usable on Linux, and it installs quite similar to any other modern desktop application. Inside Xfce’s browser, search for Google Chrome (Firefox is also available, if you’d rather use Firefox for your browsing needs) and follow Google’s instructions to download and install Chrome onto your device. Trust me when I say installing Chrome is an important step to making Linux feel like a mature desktop experience.

There’s also some basic settings I recommend changing to improve Xfce. Open settings by either clicking the drop-down applications menu in the top left corner, or by right-clicking the desktop. In either menu, arrow over settings and select settings manager. This’ll give you access to all of Xfce’s settings in one menu. Let’s quickly go one-by-one: under appearance, I changed quite a few things. In the style panel, I found myself drawn to Xfce-4.6, but you can try out any of the themes available. Under icons, I preferred Ubuntu-Mono Light, which feels quite a bit more modern than the stock Tango icons enabled by default. Under font, I liked Liberation Sans, but again, try out the choices here to find your personal preference. Press “<All Settings” at the bottom of the menu to return to the previous screen. The only other “personal” settings I changed are under desktop. Desktop allows you to change your background, menu settings, and icons. I changed my icons to “none” to hide all of the unusable folders.
Under hardware, select keyboard and choose the Application Shortcuts tab. There’s a few specific shortcuts we should put in here; namely, the ability to control your brightness and volume with the keys on your keyboard. Obviously, these are pretty important functions, so follow this detailed guide to get set up. If you’re like me, the default mouse speed is far too slow for you. Under mouse and touchpad, use the acceleration settings to find the right speed for you. You can also reverse the scroll direction here, though take note: due to a bug in Chrome that’s been around since March 2016, scrolling will be standard in Chrome, regardless of your settings.
One last tip to increase usability: right-click on the taskbar at the top of your screen, arrow over Panel, and select Add New Items. Select “Battery Monitor” and click add. This will put a battery percentage level in the top right corner of your display, which is very useful.
Switching Between Chrome and Linux
A few last words before we wrap up this guide. As mentioned earlier, Crouton is built specifically to allow you to switch between Chrome and Linux at a moments notice. The two can run at the same time on any machine, which means you can have the utility and function of Linux with the smoothness and security of ChromeOS. This, above all else, is why Crouton is the recommended distro of Linux to be installed on a Chromebook.
So, let’s say you’ve been using Linux for an hour or two, getting set up and used to the operating system. How exactly do you switch back to ChromeOS? Do you need to reboot the system or shut the machine down to get back to your Chrome apps? Not at all, actually. Switching between the two programs is simple and fast, and requires just four keys. The shortcut is simple: click and hold CTRL, ALT, SHIFT, and the back key (next to escape) and your screen will go black for a moment, before reintroducing you to Google’s operating system. Want to switch back to Linux? Hit the same three keys (CTRL, ALT, and SHIFT) and hit the forward button. You’ll jump right back into Linux; it’ll look something like this GIF I made. Both operating systems run at the same time, so if you’re playing audio in Linux and you need to jump to ChromeOS quickly, your music or video will continue to play. It’s almost like having double monitors built into one single-screened laptop.
And one final reminder: if you reboot your Chromebook, you’ll also have to reboot Linux. This can be done by opening Chrome’s developer shell using the CTRL, ALT, and T keys. Type “shell,” hit enter, and then type sudo startxfce4.
Conclusion
Running Linux on a Chromebook isn’t for everyone. It’s not the easiest thing to set up—although much of it is automated—and Linux as an OS has a bit of a learning curve. But if you need a mainstream desktop app for work or play, whether it be Skype, LibreOffice (a free Microsoft Office equivalent), VLC, or any number of assorted PC-based apps, Linux can be a really useful tool. It even helped me write this very article after I installed it on my personal Chromebook! ChromeOS itself is a fast and safe operating system, but it simply can’t do everything certain users need. Hopefully, this guide was a welcome introduction to the world of Linux on a Chromebook—even I learned some things! If you do have any further questions on how anything in the Xfce distro of Linux works, feel free to reach out to us in the comments below.


2 thoughts on “How To Install Linux on a Chromebook – A Complete Guide”