


How To Kick Someone off your Wifi Internet Connection

WiFi acting a bit sluggish lately? You likely expect that for the monthly bill you’re dishing out, you shouldn’t have to be dealing with these WiFi connection issues. What if I told you that it may not, in fact, be a connectivity issue that is causing those Wifi woes?
“Wait. What are you trying to tell me?”
If your WiFi has slowed to a crawl, or if you’ve been seeing additional charges popping up on the monthly bill for going over your data plan, it could actually be that your WiFi security has been compromised. Someone within your WiFi’s reach could be draining you of precious data and bandwidth right under your nose.
So how do we combat this heinous act and give those internet freeloaders the boot? In this article, I’m going to show what to look out for, explain the risks you run using WiFi hot-spots, and how to kick unwanted users off of your WiFi connection.
To Catch A WiFi Predator
With the problems described above, you’ll need to first be sure that you’re dealing with an internet thief and not just an ISP line error. To do this, you’ll have to access your router page by logging into your home router via an internet browser.
To log into your router as an administrator:
- First ensure that your PC is currently connected to your router. Should be rather easy, just see if you can pull up a webpage. For a more technical approach, Windows users, check the bottom-right area of your desktop. In your taskbar, look for the Internet Access icon. This can appear as either a PC monitor (connected via Ethernet) or a dot with waves emitted from it (if connected via WiFi). Mac users can also check for an Ethernet or WiFi icon in the Menu Bar.
- Pull up a tab on your browser (anyone should do) and type in the router’s IP address into the URL bar. The standard router IP is usually set to one of these three: 192.168.0.1, 192.168.1.1, or 192.168.2.1. If none of these work for you, you’ll need to go and search for your Default Gateway IP. There are a few ways to do this but we’ll keep this short and provide the quickest ways;
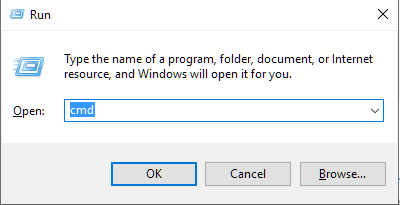
- Windows, you’ll want to go through the IPCONFIG process. Pull up your command prompt by typing cmd into the search bar attached to your taskbar (Windows 10) or press the Windows Key+R simultaneously to open the run command, and type cmd there.


With Command Prompt open, type in ipconfig | findstr “Default Gateway” and press ENTER.
The IP needed can be found to the right of Default Gateway.

- Mac, head to System Preferences and click Internet. The IP address can be found next to “Router”.
- Windows, you’ll want to go through the IPCONFIG process. Pull up your command prompt by typing cmd into the search bar attached to your taskbar (Windows 10) or press the Windows Key+R simultaneously to open the run command, and type cmd there.
- Now that you’ve got your IP and entered it into the URL bar in your browser, the router admin page should be on your screen. Enter the admin login information to access the settings.
- If you’re the admin and know that nothing has been changed since you’ve received the router, the default username and password can be found on the router itself. location and characters can vary depending on the brand of router you have. It’s usually some combination of “admin” (username and password) and “password” (for the password). Cisco routers can also use the word “cisco” for both. To be safe, consult the documentation that came with the router.
- After logging in, find the DHCP settings, “attached devices”, “WiFi connections”, or something similarly named. This will help you see which devices are currently connected to your router. You may not see which is connected via cable or WiFi, but you can see which of them does not belong (if any).

If you’re unsure which of the devices are yours, you can choose to shut off every device currently connected to your network. Those that remain connected on the list are accessing your WiFi network without your permission. You may not know the culprit but you can remove them from your network and bolster your security.
As a matter of fact, I insist.
Securing Your WiFi Connection
You’ve spotted a device on the list that is unlike the others. Now it’s time to extricate your WiFi connection from the all the hobos riding freely on your bandwidth train. The easiest way to accomplish this goal is to change your WiFi password to something a bit more secure. Chances are the leeches have figured out the current password and that’s why they’re there.
Since you’re already in your router:
- Head to the WiFi Password Settings area (or something similar).
- Type in a new WiFi password. Make sure that it is far more secure than the current one.
- When creating a strong password, you’ll want to avoid complete English word patterns by injecting special characters and numbers instead of letters. Instead of iamthegreatest you’ll create something more secure by altering it to read 1@m7H3Gre4T3$t! The proposed version is far more difficult for a standard dictionary program to guess in a short amount of time.
- Once you’ve come up with a secure password that you’re comfortable with, save the settings.
As soon as you change up your password, those users who don’t know the current credentials will be immediately removed from the connection. I’d recommend rebooting your router by disconnecting the power cable and waiting approximately 30 seconds before plugging it back in. You will also need to set all of the devices in your home to use the new password.
Next, we should make sure to encrypt your network traffic with WPA or WPA2 encryption. These are essentially additional layers of protection for your WiFi connection. WPA stands for WiFi Protected Access and WPA2 is just an upgraded version of this. Every device that has been built post 2006 comes standard with WPA2 encryption.
Your device is likely already WPA2 encrypted, but if you’re using a device without WPA2, you should first ask yourself “Why?” and then get yourself an upgrade. With WPA2 enabled, all traffic in or out of your router will be scrambled with the most up-to-date encryption standards.
Additionally, you should change the SSID of your router as well. The SSID is the name of your router network so change it to something recognizable. Connect all of your home devices to the newly named network. Once finished, disable SSID broadcast. This ensures that no one outside of those already connected, will get to see your network even when in range.
To disable your SSID broadcast:
- In your router, look for something called “SSID Broadcast” and check to see if it’s currently set to enabled.
- From this point, you’ll need to refer to the documentation that came with the router to successful hide the SSID. It may even be necessary to check with the manufacturer of the router by visiting the specific webpage. Here is the Linksys page if you happen to have this brand of router.
Devices that need to connect post disable, will need to enter in the SSID and security mode manually. Once the initial connection is made, the information can be saved to the device for future use.
Advanced Security Protocols
Your network can never be 100% impervious to a hacker dedicated enough to gain access. But by layering on enough security practices, you can give hackers pause and divert their attentions toward an easier target.
Though, not specifically related to your router’s setup, disabling File and Printer Sharing on Windows is a great idea to reduce a substantial data breach.
To begin:
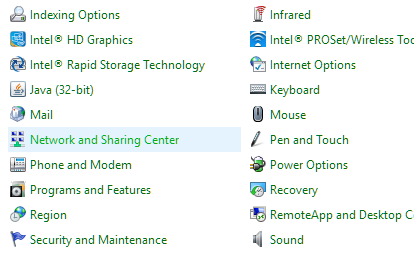
- Pull up the run dialog (Windows Key+R) and type in control to open the Control Panel.
- Switch the View by to “Small icons” and click on Network and Sharing Center.

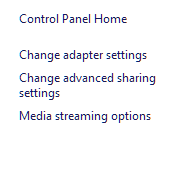
- From the menu listed on the left-side panel, click on Change advanced sharing settings.

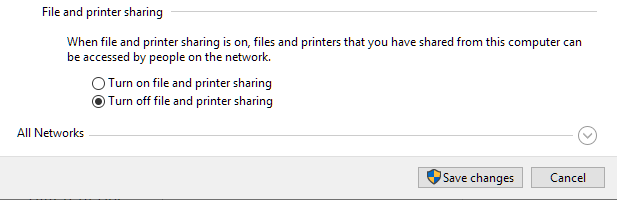
- Open up the specific network profile you want to disable File and Printer Sharing from and click on the “Turn off file and printer sharing” radial button.

- Follow this up by clicking on Save changes.
Another line of defense to consider is MAC address filtering. This will limit the devices that can join your network thereby improving overall security. Most, but not all broadband routers have this as an optional feature. In order to use it, you’ll have to procure all of the approved devices’ physical MAC addresses and then enter them into your router. Once put into their proper places, you can enable the MAC address filtering option.
Some routers will allow you to see each devices’ MAC address directly from the admin console. For those devices you can’t see, you’ll need to seek them out using your operating system.
- -To find a MAC address in Windows, you’ll need to use the IPCONFIG option we used earlier. Head back into your command prompt and type in ipconfig /all or winipcfg and the window should display all MAC addresses currently being used.
- -Using a Mac to find a MAC address, open up the TCP/IP Control Panel. For systems running Open Transport, it should appear under the User or Info Advanced screen. If running MacTCP, it can be found under the Ethernet icon.
One final piece of advice when it comes to your network’s security is to disable the WPS or WiFi Protected Setup. This feature tends to be very insecure and with a quick google search, is easily hacked. The procedure varies by router manufacturer so seek out the appropriate support page for your router’s brand.
Understanding The Risks
Anytime that you connect to an open WiFi connection, like in an airport or Starbucks, hackers will pose a risk to your device. Those who choose to break into your network and onto your devices clearly do not have your best interests in mind. Chances are the breach is malicious in its intent and private information can easily fall into the wrong hands.
No matter the network, home or public, you should follow best-practice security guidelines and routinely monitor your router’s access logs. Minimize the risks imposed on you through unauthorized network intruders and rest a bit easier.
If you’d rather not do this on your own, you can always contact your ISP for support. Reach out to them for any instruction regarding your router, especially if they are the ones who provided it to you during network installation.
Prior to calling, gather up any necessary information they may need in order to best assist you. This is usually an account number or billing address. Both of which can be found on a monthly billing statement.
Inform the agent that you feel someone may be using your WiFi connection in an unauthorized manner. If the router came from your ISP, they can log into it directly and rid you of any intruders.
They will likely ask if you’d like to change the router password. The agent can do so for you or you can provide the password to them to input into the router. On top of this, you’re router may need a few necessary updates that the agent can handle for you as well. This is especially true if you’ve never touched the router beyond moving it around in order to create a more feng shui environment.


One thought on “How To Kick Someone off your Wifi Internet Connection”