


How to use parental controls on your PC


Image courtesy of Rainer Stropek/Flickr.
The internet is a great place, filled with all the world’s knowledge at the tip of your fingers. Oh, and also lots of porn. As such, you may sometimes want to monitor what the kiddos are doing when they’re online to make sure they’re not doing anything that could be harmful or even illegal.
But just how do you set up parental controls on your PC? Turns out, operating systems like Windows 10 have some pretty good parental controls built right into them. Alternatively, you may want to look elsewhere to enable parental controls. Here are a few ways to keep track of the kids while they’re using the computer.
Tracking a Windows 10 child’s account
One of the ways you might want to monitor your children’s use of the computer is by setting up a child’s account — a feature that was first introduced in Windows 8 and has been present ever since. Here’s how to create and monitor a child’s account.
Setting up the account
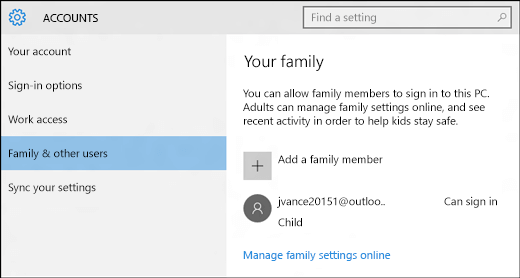 Setting up a child’s account actually isn’t all that different from setting up a normal account. In Windows 10, simply open up Settings, head to Accounts, then click on the “Family & other users” button in the left-hand menu pane. Click the “Add a family member” button, and then hit “Add a child.” That’s when you’ll set up all the information that Windows 10 will need to set up the account, which you may notice will include their email address. If they don’t have one, you can simply set one up for them through Outlook.com — which Windows 10 makes easy to do.
You’ll also need to enter a phone number — but don’t worry, you can just enter your own here. This is the phone number that will be used to get you a code if the account gets hacked or you get locked out for some other reason.
The next screen will present you with a few options — which you may want to uncheck. The first option is whether or not you want to let Microsoft Advertising use the account information, while the second will send promotional offers to the attached email address — two things that don’t need to happen for a child’s account.
That’s really all you need to do — it’s a pretty straightforward process. Next up, however, you’ll want to go over the Family Safety settings.
Family Safety
Once your child’s account has been created, you’ll still want to manage how it can be used. That’s what Family Settings are for. First up, navigate to the Family Settings website by going to the same “Family & other users” menu as before, then pressing the “Manage family settings online” button.
The first thing to look at is the “web browsing” category. In that category, as you might expect, you can flick the option to “block inappropriate websites.” You can also choose to only allow your children to browse websites on an approved list of websites — which you can then edit.
Next up, you can also allow or block apps and games based their age rating. So you can allow games that are approved for 7+, and disallow games that are only approved for 18+.
Last but not least, you can manage when your child can actually use the computer — making sure they can’t spend the entire night online. As you might expect, you can basically just choose the earliest time your child can use the computer, as well as the latest time — and you can edit times based on day.
Third party software
 You don’t necessarily have to use Microsoft’s built-in parental controls, especially if you’re looking for something a little more comprehensive. One of the best known programs for tracking internet use is called Net Nanny, and it allows you to track internet use on Windows, OS X, and Android. It does cost $39.99 per year for a single license, or $79.99 per year for a “Family Protection Pass,” which will let you install the software on multiple devices.
Using the software, you’ll be able to see each and every website that is visited through the web interface, and you can select which websites are and are not allowed. Sure, it’s pricier than the Windows version, but it’s also much more granular and allows for much tighter control.
Closing
Windows’ built-in parental tracking is the easiest and cheapest option, but if you’re really looking for something that offers a little more control, you’ll need to spend a bit of money. Whatever option you choose, however, rest assured that it should be reasonably easy to make sure your kid doesn’t stumble onto anything they shouldn’t.


One thought on “How to use parental controls on your PC”
I should use other parental control program (K9, Time Boss, Kasper)?