


How to Enable Waiting Room in Zoom

In the past, Zoom had some issues with security. For that reason, they added the new Waiting Room feature, an online waiting space to ensure that attendees can only join a meeting when the host says it’s okay.
This is an excellent option to utilize in cases when medical professionals host multiple appointments, for instance, or when HR departments conduct job interviews. But how do you enable the Zoom Waiting Room feature? This article explains everything.
Zoom Waiting Room – How Does It Work?
The role of the host in Zoom means that you have a lot of options. You can assign a co-host or pass the hosting role to another person, and also manage and control who joins the meeting in the first place.
If you want, you can accept participants one by one, or you can just let everyone in at the same time. It’s entirely up to you. You can also send everyone to the Waiting Room right away, including participants and guests who aren’t part of your Zoom account or even signed in yet.
You can enable the Waiting Room feature only as a licensed user, and only on the desktop and mobile app, not the Zoom web portal. Waiting Rooms are available for a company account, for a group, individual user, individual meeting, and for all meetings with your personal meeting ID (PMI).

Enabling Waiting Room for Company Account
To enable the Waiting Room feature for all users in a single account, the person with administrator privileges has to make these changes. Here’s what they need to do:
- Log into the Zoom web portal.
- Go to the navigation menu and select “Account Management”.
- Now select “Account Settings”.
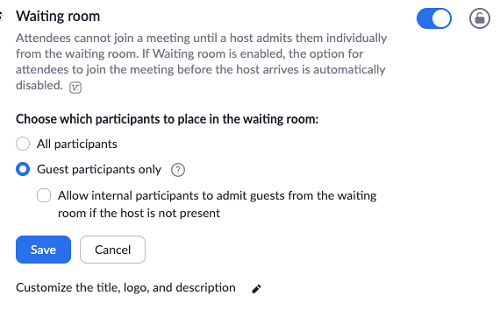
- Click on the “Waiting Room” option and then “Meeting” and make sure that this setting is enabled.
- This is where you choose who you want to admit in the waiting room. Here are your options:
- All participants – everyone goes to the Waiting Room.
- Guest participants only – people who aren’t in your Zoom account or aren’t logged in will wait in the Waiting Room.
You can also make this setting mandatory for everyone in your account. Just click on the “Lock” icon to make that change.
Also, the enabling process for the group and individual users is precisely the same as for the company account. The process of enabling a waiting room for one-on-one meetings and meetings with your personal ID is a little bit different.
Individual Meeting
To make sure you have the Waiting Room option for your individual meeting, you first have to enable the feature in meeting settings. Here’s how you do it:
- Log into the Zoom web portal.
- Select “Meetings”.
- Schedule a new meeting. Or select an existing meeting topic to edit.
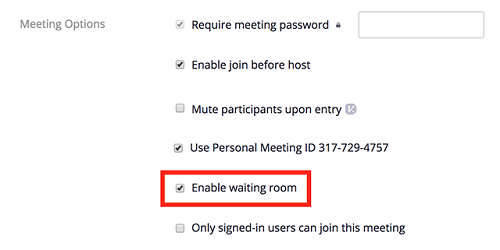
- Check the “Enable Waiting Room” box under the “Meeting Options”.
- Confirm by clicking “Save”.
Meetings with Your Personal ID (PMI)
With Zoom, you can have a Personal Meeting Room, an online meeting place that’s always there for you. It’s yours permanently, and you can access it with your PMI. What’s more, you can use it to set up a meeting very quickly.
The Waiting Room feature is handy when it comes to Personal Meeting Rooms as it gives you more control over how participants are admitted. Here’s how you enable the Waiting Room option for meetings with your personal meeting ID:
- Log into the Zoom web portal.
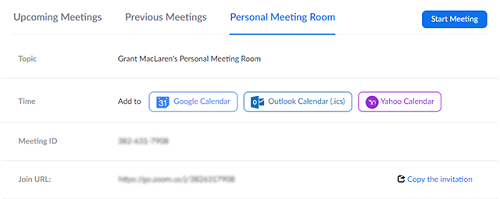
- Select “Meetings”.
- Select the “Personal Meeting Room” tab.
- Select “Edit this Meeting”.
- Check the “Enable waiting room” box under “Meeting Options”.
- Confirm by selecting “Save”.
Using the Waiting Room Feature in Zoom
While the meeting is taking place, you can disable the waiting room and enable it again. You can also send participants to the Waiting Room. As the host, those options are available to you.
But did you know that you can customize the Waiting Room as well? – if only for licensed users, though. You can give it a title, a logo, or even add a description limited to 400 characters. It’s a nice opportunity to greet everyone and perhaps offer some important insights into what you want a participant to take away from the meeting itself.
Zoom Makes Waiting Rooms a Little Better
No one likes sitting around in a waiting room. Not even a virtual one. But with the Zoom customization feature, it can be more fun. And if you’re the host, the Waiting Rooms make all the difference, especially from a security perspective in content-sensitive meetings.
Plus, it’s an excellent organizational tool, which is very much needed in larger meetings. What’s more, setting up a Zoom Waiting Room is simple and requires just a few right clicks on the Zoom web portal.
Let us know what you think about the Zoom Waiting Room feature in the comments section below.


One thought on “How to Enable Waiting Room in Zoom”