How to Setup a Belkin Router

For a quick and simple setup of Belkin routers, the older ones always came a Setup CD included in the box. Just load the CD and the installation wizard will guide you through the process.
But, who still has a CD/DVD drive these days?
Of course, the Setup CD is not the only way to make your router come to life. You can install it manually, using the router setup page that opens in a web browser.
Also, when installing a router, it’s safe to assume that you already have a modem and an internet connection. To make sure that you have everything you need for the setup, here’s a list of the required parts:
- Your Belkin router
- Power adapter for the router
- Yellow network (Ethernet) cable
- Blue network (Ethernet) cable
- Internet modem
- Power adapter for the internet modem
To install your Belkin router, you’ll have to follow these two major steps:
- Switch on your modem and router.
- Set up the router manually.
1. Switch On the Modem and Router
Initializing your modem and router is not as simple as plugging them into a power outlet and turning them on. There is a sequence that you should follow in order to ensure that both devices recognize each other properly.
- Start with both your modem and router unplugged.
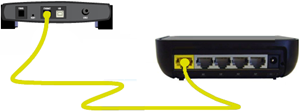
- Plug one end of the yellow Ethernet cable into the modem.
- Plug the other end of that same cable to the internet port on your router. If you’re not sure which one, look for a port that’s labeled “WAN” or “Internet”.

- Plug your modem into the power outlet and wait for 20 seconds.
- Now plug your Belkin router into the power outlet as well.
You should’ve successfully initiated both the modem and the router, allowing them to communicate with each other.
2. Setting Up the Router Manually
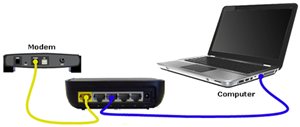
Now that you have connected your router and modem, it’s time to connect them to your computer for setting up the router.
- On the back of your router, you should see Ethernet ports 1 to 4 (or more, depending on the model of the router).
- Plug one end of the blue Ethernet cable into one of the ports.
- Plug the other end of the cable to your computer’s Ethernet port.

- Open your preferred web browser on your computer.
- In the browser’s address bar, type in the IP address of your router and press ENTER. In most cases, the default IP address is 192.168.2.1 or 192.168.1.1.
- The router setup page should open, so click on the “Login” button.
- Next, the page will ask for your password. Since you still haven’t created a password, just leave it blank and click “Submit”.
- In the “Internet WAN” menu, click on “Connection Type”.
- In the “Connection Type” menu, select the type of your internet connection. This depends on your internet provider. If you’re using a cable operator to connect to the internet, you should select the “Dynamic” type. For ADSL connections, select “PPPoE”. If you have subscribed for a static IP address, choose “Static”.
NOTE: Contact your Internet Service Provider (ISP) to find out which connection type you’re using. Also, they should provide the corresponding connection parameters to allow you to connect to their service. - After that, click “Next”.
- In the next menu, enter the connection details given by your ISP. What you enter next depends on the connection type previously chosen. Here’s an overview of the most common types:
1. Dynamic (Cable)
1. In the “Host Name” field, enter this information if provided by your IPS. If not, leave it blank.
2.PPPoE (DSL)
1. Enter your username and password where required.
2. If your ISP has provided any other info (such as Service Name, MTU, etc.) enter that as well.
3. Static (Static IP address)
1. Fill in the fields for “IP Address”, “Subnet Mask”, and “ISP Gateway Address”.
2. Click on “Click here to enter your DNS Settings”.
3. Fill in the fields for “DNS Address” and “Secondary DNS Address”. - To confirm the entries, click “Apply Changes”.
- If a pop-up window appears, click “OK”.
This should get you online. Check the “Internet Status” in the upper right corner of the router setup application. If it says “Connected”, you’re all set.
One Router to Route Them All
The best thing about having a router is that it enables multiple devices to simultaneously use a single internet connection. That’s why routers have been a part of modern homes for quite some time.
For example, let’s say that you have a Wi-Fi router at home. This allows you to connect all your devices to the internet over the Wi-Fi network, without using any of the Ethernet ports on your router. But, having too many devices on your Wi-Fi might overload it at times, resulting in a poor connection.
To prevent these network bottlenecks, you can consider connecting some of your devices directly to the router with Ethernet cables. Prime candidates for this are devices that stay in one place, like those in your entertainment system.
If you have your smart TV, gaming console, and entertainment laptop all connected to a router by cables, they’ll have the full bandwidth of your internet connection rather than depend on the quality of your Wi-Fi network.
This is ideal for watching films and TV shows on popular streaming platforms. With today’s Full HD and 4K content, it’s essential to establish a stable connection for all that data to pass through without a glitch.
Smart Routing
Usually, a router is not such a remarkable device when you look at it. But, beneath all that plastic, there’s a lot of magic going on. Routers help direct traffic from various devices to their designated targets without losing any data in the process. As mentioned previously, they also allow devices to share a single internet connection. All of that is done by prioritizing the requests from each device and executing them in an order that maximizes performance.
Do you have additional questions regarding the installation of a router? Perhaps you have some advice you’d like to share? Please share your experiences in the comments section.