


How To Setup a Cisco Switch

A Cisco switch is a central component of your network. It connects linked devices and allows you to monitor the network traffic information.
Be it network reorganization or brand new installation, it’s important to configure the switch properly. Make sure all your devices are connected and then focus on the setup.
Cisco Switch setup requires you to be tech-savvy but fear not as we’ll walk you through the setup process and try to make it as clear as possible.
![]()
Hardware Checkup
First, you need to determine the exact switch model – Cisco 3750 or Cisco 2960 for example. With used switches, you should also inspect the device for physical damages.
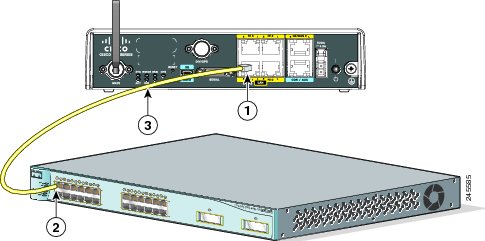
Turn on the switch and make sure all the lights are working. If everything is fine, connect to the switch from your computer. For this, you need a rollover cable and Putty, a free telnet and SSH client.
Choose the serial connection (9600 speed) in Putty and test the output with the following commands:
- Show vtp status
- Show version
- Show vlan brief
- Show running-config
IP Management Setup
The switch hostname may vary depending on your needs. Once you assign the name, use management VLAN to set up the IP address. Make sure to assign the right domain name as well. Here are the commands:
(config)# ip domain-name (type name here)

(config)# hostname Switch01

(config)# interface Vlan1

(config)# description Management Vlan

(config)# ip address 192.168.101.1 255.255.255.0
VTP Revision Number
Run the “show vtp status” command to check if the switches use the VLAN Trunking Protocol (VTP).
A brand new switch has zero as the VTP revision number. Each VLAN database change increases the number by one (for used switches.) A new setup requires the switch to have the revision number of zero.
You can reset the number if you change the VTP Domain Name and change the name back again.
Configuring Access Ports
Here is an example of the configuration, including the necessary commands:
description *** DESCRIPTION ***

switchport access vlan ###

switchport mode access

power inline consumption ###

queue-set 2

mls qos trust dscp

storm-control multicast level 50.00

no cdp enable

spanning-tree portfast

spanning-tree bpduguard enable
The actual configuration depends on your needs and connected devices such as phones. Additional or different configuration commands might be necessary.
Configuring Trunk Ports
Issue “sh int g0/1 capabilities” command to check trunking protocol. New Cisco switches usually don’t support ISL, but if you are working with an older one, ISL might be supported.
- With ISL support type: “switchport trunk encapsulation dot1q”
- Without ISL support type: switchport mode trunk
There isn’t additional encapsulation for the latter, so you don’t have to type encapsulation command.
This is an example of trunk ports configuration you can use:
interface GigabitEthernet1/0/1

description *** UPLINK ***

switchport trunk encapsulation dot1q

switchport mode trunk

speed 1000

duplex full
SSH Access Configuration
You need RSA keys for SSH access configuration. You can generate the keys using the following command:
Switch01(config)# crypto key generate rsa
The name for the keys will be: Switch01.yourwebsite.com
Choose the size of the key modulus in the range between 360 and 2048 for your General Purpose Keys. Choosing a key modulus greater than 512 may take a few minutes.
How many bits in the modulus [512]: 1024
% Generating 1024 bit RSA keys, keys will be non-exportable…[OK]
VTY Line Configuration Setup
The command to set up VTY Line configuration is:
# line vty 0 4

(config-line)# transport input ssh

(config-line)# login local

(config-line)# password your password

(config-line)# exit
In case you haven’t set up the console line, input the following values:
# line console 0

(config-line)# logging synchronous

(config-line)# login local
Use the “enable secret password” command to enable the password. And set up executive privileges with the “username name privilege 15 secret password.” To encrypt the password, use the following command:
Switch01# service password-encryption
Type “sh ip ssh” to confirm SSH is enabled on your Cisco switch. Now you can log in from another machine to confirm you can ssh. Use the following command:
remote-computer# ssh 192.168..101.1

Login as: username

Password:

Switch01>en

Password:

Switch01#
Once you confirm, exit and disable before you proceed to TACACS+ setup. To save your setup, run the following command:
copy running-config startup-config.
TACACS+ and AAA Setup

These protocols work together to help you manage the switch login security. You can refer to official websites to find out more about the best setup practices because the steps might differ based on your need.
But with AAA and TACACS+ setup out of the way, you only need to test access, reload the device, and prepare the cables before you rack the switch up.
Happy Switching
Switches are a crucial piece of equipment for your network. And it takes some time to tweak all the necessary settings. This article should provide you with enough knowledge to avoid trial and error. But if you are not sure how to do it, it’s best to hire a network engineer to prevent potential mishaps.


