


How to Use Split-Screen on a Dell Laptop
Working on a Dell laptop can get a little complicated because you have to switch tabs and windows all the time. That goes double when you have to do extensive research for a school project or your job. You can, however, split the screen on your laptop allowing you to get more work done faster. Keep reading, and we will give you a few different methods you can use to split the screen on your laptop.
Dell Latitude 13-7350 Series Split Screen
The Latitude 13-7350 laptops have a built-in split-screen feature. The feature is ideal for multitasking, and it’s super-simple to set up. It works on all versions of Windows. Here is what you have to do:
- Open two apps you want to see on the screen.
- Press and hold the pointer on the second app, and the screen will split.
- Release the button to drop the application in place.
Splitting the Screen with Windows Snap Assist
You can split the screen in any version of Windows, including 7, 8, and 10. Snap Assist works on all laptops and desktop computers. It differs a bit from version to version, so we’ll give you step by step instructions for each version of Windows. Keep reading if you run one of the mentioned operating systems on your Dell laptop.
Windows 7
Windows 7 was the first version with the Snap Assist feature. It allows you to drag the window to the corner of your screen and it will “snap” into position, leaving the rest of the screen free for another window. You can disable the feature in the settings at any time. Here is how Snap Assist works on Win 7:
- Open two apps or windows at the same time.
- Place your pointer on the top bar of one of the windows and hold the left mouse button.
- Drag the window to the right or left side of the screen.
- Keep dragging it to the side until the window “snaps” into position, leaving half of the screen empty for the other window.
- Drag the other window to the opposite side.
- You can use the arrow keys on your keyboard instead of your mouse.
Windows 8 and 8.1
Microsoft’s approach for Windows 8 and 8.1 was that most users will run the system on touchscreen devices. If you do own a touchscreen laptop or tablet that runs on Windows 8 or 8.1, you can get two windows in the split-screen mode in a matter of seconds. Just pull the two windows apart, and they will snap into position automatically.
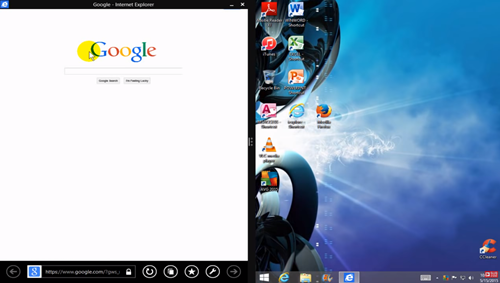
However, if you don’t have a touchscreen device, here is what you have to do:
- Open two apps or windows., One should be in full-screen mode.
- Place your pointer on the top left corner of the first app. Hold the left mouse button and drag the window to the right.
- Keep dragging it until the screen is divided with a vertical line. The second window will pop into place automatically.
- You can move the dividing line left and right to customize the size of each window.
If your computer has a powerful video card, you can snap three windows at the same time.


Windows 10
As expected, the Snap Assist feature on Windows 10 has the most options. You can set it up the same way it’s done in the previous versions of Windows, but there are some extra options. Here is how the feature works on Windows 10:
- Open multiple windows or applications.
- Place your cursor on the top bar of one of the windows and drag it to the side until it “snaps” into place.
- The first window or app will take up half of the screen. Click another window and drag it to the center of the opposite side.
- With your screen divided into two, drag and drop other windows to each corner of the screen.
- Try dragging and dropping windows in different corners of the screen to see how they arrange automatically.
- Drag any of the windows to the top of the screen to maximize it. Drag it to the center of the screen, and it will go back to its original size.

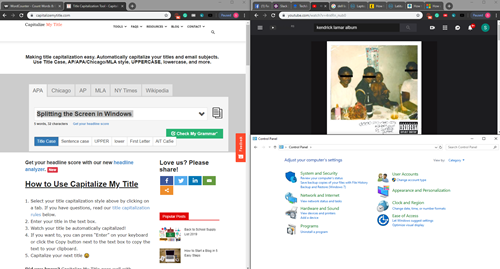
When your windows have snapped into position, you can move each by holding the Windows + left or right arrow keys together.
Snap Feature Makes Life Easier
Working with multiple tabs can really complicate your creative process. The native split-screen feature available since Windows 7 allows you to divide the screen and open multiple apps or windows. The feature has been perfected with Windows 10, and it enables you to open up to six windows at a time.
What do you use the split-screen feature on Windows for? How many windows do you keep open at the same time? Tell us what works best for you in the comment section below.


One thought on “How to Use Split-Screen on a Dell Laptop”