How to Delete a Teacher Account on ClassDojo

There are four types of ClassDojo accounts – Teacher, Parent, Student, and School Leader, and each has a different signup process. For example, if you’re a parent and have made a teacher account by mistake, you can quickly delete it. Also, if you’re both a teacher and a parent, you can toggle between the two accounts easily. This article will show you how to do both.
Removing the Teacher Account
Are you already a teacher using ClassDojo and want to create a new teacher account on ClassDojo? Or you’re a parent creating your first ClassDojo account and made a few wrong clicks and found yourself with a teacher account?

Fortunately, deleting a teacher account is simple. You should keep in mind that the only way to do it is through the ClassDojo web portal. IOS and Android apps still don’t support this action. Here is what you need to do:
- Log into your ClassDojo account on the web.
- Select your name.
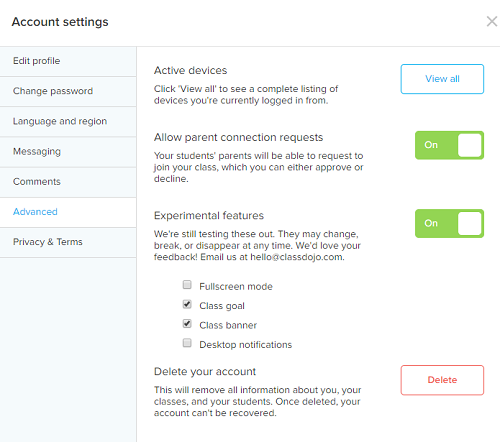
- Click on “Account Settings.”
- Click on the “Advanced” option.
- Select the “Delete” icon, which is right next to the “Delete Your Account” option.
That’s it, you’ve deleted your ClassDojo account permanently. All of the information you had within the account won’t be available anymore. That includes classes and anything else you might have posted for your students.
And since you can never recover this account, it’s wise to be sure that you want to go through with it before you hit that “Delete” button.
Changing the Email
If you’re gearing up to delete the teacher account on ClassDojo because you want to use a different email, it’s completely unnecessary.
You can easily change the email that’s associated with your ClassDojo teacher account. Another good news is that you can change this setting from the app and the web portal.
Web
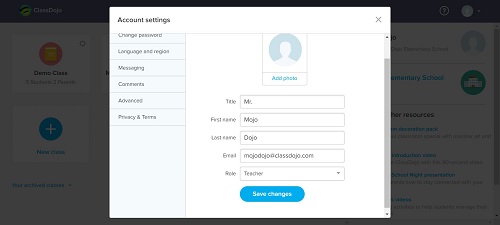
- Log into your account.
- Click on your name.
- Click on “Account Settings.”
- Type your new email address.
- Select “Save changes.”
iOS
- Launch the ClassDojo app and select “Account settings.”
- Tap on “Edit” on the top of the screen.
- Type your new email address and hit “Save.”
Android
- Open your ClassDojo app and select “Account settings.”
- Tap on your current email address.
- In the pop-up screen, type the new email and tap “OK.”

Toggle Between Parent and Teacher Accounts
Some parents are also teachers, and most teachers are parents. That means that they get to sit at both sides of the table. You can utilize the Account Switcher feature on the ClassDojo app. For the moment, this is not possible on the web portal. On the web, you can sign out from your teacher account and sign in as a parent, and vice versa.
That’s why if it’s easier to go from one account to the other via the app. The process is identical for both iOS and Android devices, and it goes like this:
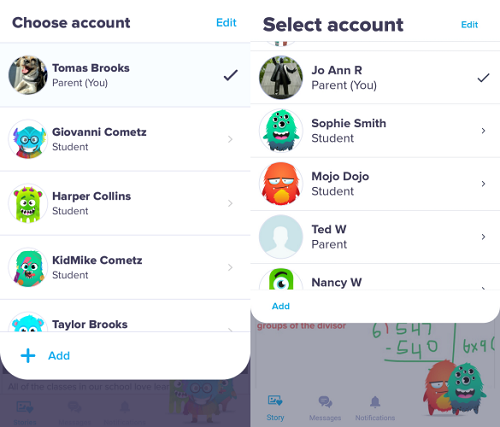
- Open your ClassDojo app and tap on the picture on the left upper corner.
- You’ll see all your accounts and select the one you want.
- The app will automatically switch you to the account you want to use.
Managing Your ClassDojo Accounts Is Easy
Whether you’re a teacher or parent, or both, creating and deleting accounts is a walk in the park. When you’re ready to remove your teacher account, it will take you just a few clicks. But don’t forget that you have to do it via the ClassDojo web.
If you want to change your email, you can do it on any device. And if you’re a parent and a teacher, the toggle account switcher will make your life easier.
Have you ever used the ClassDojo app before? Let us know in the comments section below.