


How to Make A Panorama in Google Photos

If you love taking photos while out and about, and have a set that you want to turn into a stunning 360-degree panorama, then you have a few options. A lot of phones and camera have a built-in ability to shoot panoramas.
Google Photos can automatically create a panorama for you, provided that your pictures have all of their metadata intact.
The problem is that when you edit your photos, it’s pretty easy to forget to save them with the original metadata intact. Unfortunately, there’s no option to make one manually via Google Photos, so you’ll need that metadata.
How to Get Google Photos to Automatically Make a Panorama
Simply put, you just need to upload all of the pictures to your Google Photos account and, as long as they have at least GPS tags intact, Google should recognize them and automatically create a panorama. Note that it can take a few hours or even days.
Some users have reported that putting the panorama images into their own folder in Google Photos can make things quicker and easier.
However, it’s pretty easy to not end up with the necessary GPS metadata. So let’s go through how to find out if it’s there, and what you can do if it’s not.
How to Check If the Metadata Is There
It’s easy enough to confirm if your metadata is still attached to your photo if you’re using Windows 10. Just follow these steps:
- Find where the photo is saved on your computer.
- Right click on it.
- Click on Properties.
- Click on the Details tab.
- Scroll down through the information to the GPS section.

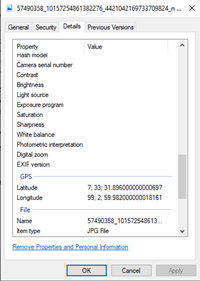
If you can’t find it, then there are no GPS tags attached to the image, meaning you either took them without sharing your location, or that you have deleted the metadata. If the image in question has GPS information and so do the others you want to include in the panorama picture, then you can upload them to Google Photos. With a bit of time (and luck, it seems) it should automatically make a panorama from them.
How to Reinsert the Metadata
Fortunately, if your photo no longer has the GPS metadata you need, you can use The eXifer, which is a free online tool for editing a picture’s exif data. Here’s what you’ll need to do:
- Open your computer’s web browser.
- Enter net into the browser bar or click that link.

- Drag and drop the image you want to edit into the box, or click on the box to browse your computer for it.
- Once it has uploaded, click on the blue exif.me button just below the thumbnail.
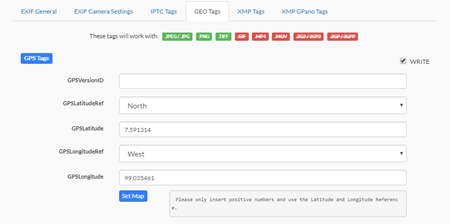
- When the new menu appears, click on the GEO Tags tab.
- Click on the GPSLatitudeRef drop down menu, and select North.
- In the GPSLatitude text box, enter the first part of the GPS coordinates.
- Click on the GPSLongitudeRef drop down menu, and select West.
- In the GPSLongitude text box, enter the second part of the GPS coordinates.


Add Panorama Tags
Next, you’ll need to add a few extra bits of information to tell Google Photos to use a photo in a panorama. Here’s what to do:
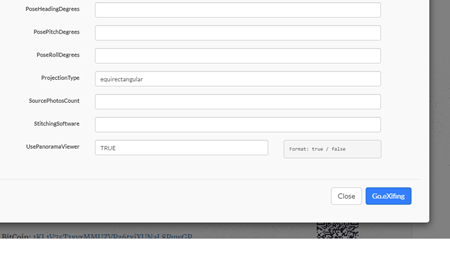
- Click on the XMP GPano Tags tab at the top of the menu.
- Scroll down to the bottom to find the ProjectionType text box, and enter equirectangular.
- In the UsePanoramaViewer text box, enter TRUE.
Add the Camera’s Make and Model
Finally, you should insert the make and model of the camera that you took the pictures with. This shouldn’t be vital for Google Pictures, but it will allow you to upload the photo to Facebook to also get an automatically generated 360-degree photo.
- Click on the EXIF General tab at the top of the menu.
- Enter the manufacturer of your camera in the Make text box.
- Enter the model of your camera in the Model text box.

Download the Image with Reinserted Metadata
You’re pretty much done now. Here’s how to finish up:
- Scroll down to the bottom of the menu.
- Click on the blue Go.eXifing button. This will update your uploaded image with the provided metadata.
- Once you see the green confirmation box at the top, click on the X at the top right of the menu, or click outside of the menu.
- Click on the green Download me button underneath your image. It’s probably a good idea to rename it so that you don’t accidentally overwrite the original.
Once you’ve done this for all of the images that you want to make into a panorama, you should upload them to Google Photos and then wait for Google to do its thing.
Take a Look Around
And there you have it, the relatively easy and free, if somewhat complex, method to get Google Photos and Facebook to turn your pictures into a panorama. If you’ve found any other easy tools for editing metadata, or you have a favorite app to make panoramas, why not let us know in the comments section below?


2 thoughts on “How to Make A Panorama in Google Photos”
Why does Google feck around with stuff that works?