


Learn How To Type Like a Boss

We have all seen them. Those people who sit at a computer head bowed over their desk, brow wrinkled and stabbing at the keyboard with just two fingers. We see them hunting for that elusive letter than has been in the same place on a QWERTY keyboard for the past hundred years but they still cannot find it. They really should learn how to type.
Learning to type isn’t difficult. It isn’t brain surgery and it doesn’t involve math or anything difficult. It is just a matter of learning where the keys are located on the keyboard and generating muscle memory in order to make coherent words. What learning to type is, is a fairly lengthy process that requires practice, like most things in life.
If you want to learn how to type like a boss this tutorial is for you!
Learning to type
Learning to type is a very useful skill. Nothing much happens in the world that doesn’t involve a computer and we text and email more than ever. While our fingers may be able to fly over a smartphone keyboard, sometimes they struggle with a real keyboard.
That starts to change today. Keyboards don’t have autocorrect and they require a lot more practice than a cellphone keyboard. However, it will reward you by allowing you to do more with less time and effort. That makes it worth learning to type properly in my book whether you’re planning a best seller or trash talking in a game’s chat window.
We will cover:
- Posture and comfort.
- Keyboard types.
- Touch typing technique.
- Honing your skills.
- The power of shortcuts.
So without further ado, let us start the journey to typing like a boss!
Posture and comfort
Before you even take a stab at the keyboard, we need to address posture and comfort. This is especially true if you’re at work or planning a long session at your home computer. If you can position yourself comfortably, in as natural a position as possible, your hands have maximum freedom of movement. The rest of your body should be able to maintain the position without too many aches and pains too.
All those times your mom or teacher told you to sit up straight weren’t just to annoy you or because they were bored. A straight seated posture with your spine as vertical as possible is the ideal. Your weight is distributed evenly down the back, the right amount of pressure is put onto your shoulders and hips and your arms can move without your shoulders remaining too tense. It is a position that you can maintain for hours on end.
If possible, position your chair and desk so you can sit upright with back straight, thighs at 90 degrees to your body and horizontal with your legs going straight down to the floor. Lay your feet flat on the floor. If you can do all that while having the desk so your elbows are at 90 degrees while you type, all the better.
Slouching is all kinds of bad. It compresses the lower back, extends the muscles at the rear of the hips and causes your shoulders to stay tense. This is not a comfortable position and you will find yourself shifting and adjusting constantly.
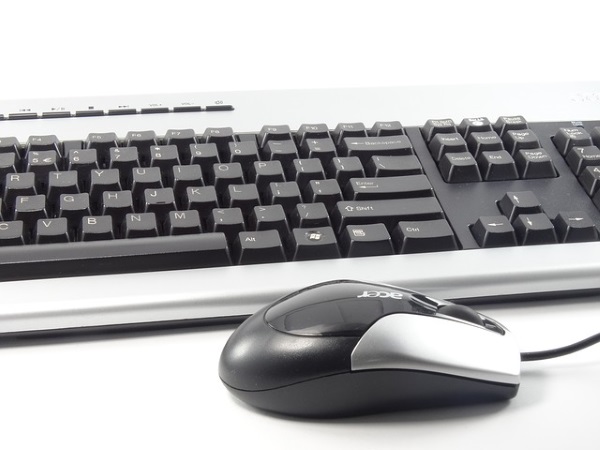
Keyboard types
Once your position has been adjusted, you should find you can comfortably maintain it for much longer. That’s good news for work, study or for gaming sessions. The next thing we need to look at when you learn typing is the keyboard.
Many computers come with a basic cheap keyboard that works fine. But, like many aspects of life, the one size fits all aspect can be drastically improved upon. Keyboards come in all shapes and sizes and can cost as little as $5 or as much as $300.
While LED lighting and functions keys are all very well, it is the key layout that makes the biggest difference. The flat keyboard is great and if you learn to type on that, your muscle memory will work with you. The ergonomic keyboard is also great once you get used to it. You will likely find that you gravitate towards one or the other. There is no ‘best’ shape here.
I use an ergonomic keyboard and can type at roughly 105 words per minute with very few mistakes. My friends hate that layout and just cannot work with it. They much prefer the flat keyboard and can perform almost as well as me. I cannot type anywhere near as fast on a flat keyboard and make many more mistakes. Try both and see which you prefer.
Touch typing technique
So now you’re sitting comfortably and have a keyboard you can work with, it’s time to begin learning to touch type. The idea is to not stab at the keyboard with just our forefingers like that guy. We aim to use all ten of our fingers, with the thumb at the space bar.
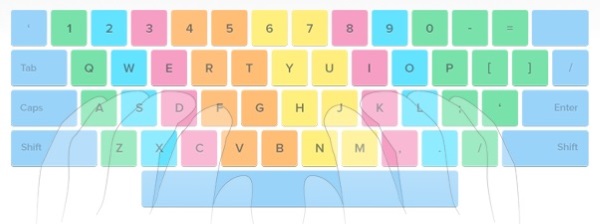
We begin with the hand and finger position. On your keyboard, you should notice a raised dot or line on the F and J key. Not all keyboards have them but most do. This is to tell you where to put your index finger. To touch type, you lay the fingers of your left hand gently over the ASDF keys and the fingers of your right hand over the JKL: keys. This is the position your fingers must start from and return to every time you type something.
Fingers should be slightly curled around and sit lightly over those keys. In the image above you will see color coding that correspond with the key that a particular finger will use. For example, you see the little finger of the left hand that sits on A is in green. Also in green is 1, 2, Q and Z. This indicates the keys that the little finger should operate.
The idea is to only ever type any of those keys with your little finger. The ring finger that sits on S will also operate 2, W and X. Use the chart to figure out where each finger should go and then practice stretching the finger to each key and being able to navigate back again. I’ll provide some websites that offer practice lessons and activities in a minute.
Once you begin to assemble sentences by just moving your fingers, stop looking at what they are doing. The ideal scenario is to be able to position and move your fingers and type while looking at the screen or your source material. This will take time so if you begin by watching and modifying where your fingers go, that’s fine. As long as you then begin to not look.
Honing your skills
Once you’re sitting up straight, have a comfortable keyboard and know the basics of touch typing, you need to practice. We are essentially going to create the muscle memory necessary to be able to put words on the screen without having to think about it. The end game is for you to be able to think of a word or sentence and for your fingers to be able to fly over the keyboard and put it out there and then go back to their position ready for more. All without having to think consciously.
You can try free-form practice if you like. Type emails, schoolwork, make up a story or whatever but there are also websites out there that provide touch typing lessons. Here are four pretty good ones. Each is a little different and approaches learning to type in a slightly different way.
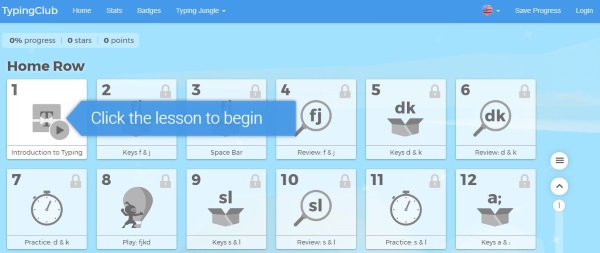
TypingClub
TypingClub is a website that teaches typing and touch typing. It provides similar guidance to this tutorial and also a bunch of exercises to help you hone your skills. You don’t have to do all of them but the more you do, the more muscle memory you generate.
Typing Study
Typing Study is another website that has a lot of typing lessons. Set your keyboard layout and then begin lesson one. You can skip some of them if you like because they repeat what is said here but the exercises and later lessons are pretty good.
Typing Test Now
Typing Test Now has 144 lessons and tests for typists at all stages of their development. They begin with the basics and gradually develop your skills while offering tests that assess your speed and accuracy throughout. The site isn’t exactly good to look at but is very effective at what it tries to do.
TypeRacer
If you’re the competitive type, TypeRacer might be for you. It’s a competitive typing game that presents you with a passage from a book. You are racing against other people from around the world and have to type the passage as fast as you can. Your progress is indicated by a small car on the screen. The faster you type, the faster the car goes. Whoever types the passage the fastest wins the race. It is a very simple but effective way to learn to type quickly once you have the basics covered.
The power of shortcuts
You may find that in your daily work or study that your typing rhythm is interrupted a lot by using the mouse or touchpad. This can spoil what can be a very fast cadence for typing but there is something you can do about it. You can use keyboard shortcuts for more actions. The mouse is very convenient but it does mean moving the hand away from the keyboard which lowers productivity.
Learning just a few of these shortcuts can seriously improve your productivity. I include both Windows and Mac shortcuts in this list with a link to the full range of those available for each. They work at the OS level so no matter what program you are using, it should work be it your browser, word processor, productivity suite or email program.
Common Windows shortcuts:
- PageUp – Move up a page
- PageDown – Move down a page
- Ctrl+C – Copy selected
- Ctrl+X – Cut selected
- Ctrl+V – Paste
- Ctrl+A – Select all
- Ctrl+B – Bold the selected text
- Ctrl+I – Italicize the selected text
- Ctrl+U – Underline the selected text
- Ctrl+Backspace – Delete the previous word
- Ctrl+Del – Delete the next word
- Ctrl+F – Find text in the current document
- Ctrl+Z – Undo your last action
- PageUp – Move the cursor up a page
- PageDown – Move the cursor down a page
- Home – Move the cursor to the beginning of the line
- End – Move the cursor to the end of the line
- Ctrl+Home – Move the cursor to the beginning of the document
- Ctrl+End – Move the cursor to the end of the document
- Ctrl+Left arrow – Move the cursor left one word
- Ctrl+Right arrow – Move the cursor right one word
- Ctrl+N – Create a new document
- Ctrl+O – Open an existing document
- Ctrl+W – Close the current document
- Ctrl+S – Saves the current document
- Ctrl+P – Print the current document
A full table of Windows shortcuts can be found on this Wikipedia page.
Common Mac shortcuts:
- Command-B – Bold selected text
- Command-I – Italicize selected text
- Command-U – Underline selected text
- Command-T – Show or hide the Fonts window
- Command-A – Select all
- Command-C – Copy
- Command-X – Cut
- Command-V – Paste
- Command-Semicolon – Spellcheck
- Fn–Up arrow – Scroll up one page
- Fn–Down arrow – Scroll down one page
- Fn–Left arrow – Scroll to the beginning of a document
- Fn–Right arrow – Scroll to the end of a document
- Control-A – Move to the beginning of the line
- Control-E – Move to the end of a line
- Command-P – Print
- Shift-Command-P – Print preview
- Command-S – Save
- Shift-Command-S – Save as
A full table of Mac shortcuts can be found on the Apple website.
Learning to type is one of those things that takes time, practice and patience. Like most other things, you get out what you put in. If you practice enough it will soon become second nature and rather than giving yourself curvature of the spine and a permanent squint, you could be touch typing at 120 words per minute in no time. If you have to use a computer for a living, that could be a significant advantage!


