


How To Size Down MP4 Video Files Using Handbrake

Handbrake is free software for Windows (including 64-bit), Mac or Linux that anyone who makes video (for hobby or for pro) should use because it’s just so damned good at what it does.
The purpose of Handbrake is to plop a video file in there (such as a WMV, AVI or MOV) and then convert it to MP4 or MKV. It’s most likely true you would be using the MP4 format.
Handbrake by default will create high-quality MP4 video files. However you may want to size down your video for faster upload to a video sharing site like YouTube – or you may want to make smaller videos for your portable video player such as an iPod Touch.
This is relatively easy to do with Handbrake once you know the settings you need to change.
Changing the “Constant Quality” setting
Location in Handbrake: Video tab
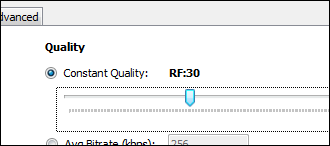
The Constant Quality is by default set to RF:20, which is considered to be DVD quality video. Dragging the slider to the left will decrease the quality of video output. You can “safely” export video from Handbrake at RF:30 and not notice too much of a loss in video quality.
To put it another way: On a big screen, yes you’d notice the quality difference. On sites like YouTube and small-screen devices, not really.
Changing the audio bitrate
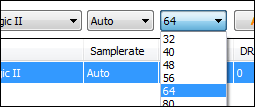
Usually, Handbrake defaults to a high quality of 160 for its bitrate. The lowest you can go before you really start hearing “washy” audio is 64. If you’re trying to get the output file size down as much as you can while still retaining “passable” audio quality, 64 will work. Anything lower than 64 and you will hear washy audio compression.
There are many other things you can do in Handbrake to get MP4 file size down, but the two settings above are a good place to start – and easy to experiment with to see what works best.
On a final note, if you just want to experiment at first, purposely use a video that’s not more than one minute long so the file exports are quick. You’ll find out faster which Handbrake settings work best for you this way. Once you find the combination that works for you, then go ahead and convert the big video file to MP4.


4 thoughts on “How To Size Down MP4 Video Files Using Handbrake”
from 20Rf to 30Rf worked well
Thanks for the info :)
So are you saying if you increase the default of 20 to 30 you will get loss of video quality ?
After trying at least three other recommendations for reducing the size of a video via Handbrake, YOURS is the first one to actually do it; file sizes reduced to 1/4 the original with no meaningful degradation in both audio and video quality.
Take a little something out of petty cash; ya done good.
:)