


How to Convert QuickBooks Desktop to QBO

If you own a small or medium-sized business, QuickBooks is a tool that probably makes your daily accounting tasks far more manageable. But if you’ve been using the QuickBooks desktop, you know you can only use it on one device.
Fortunately, you can convert or migrate your QuickBooks Desktop data to QuickBooks Online. It’s a reasonably straightforward process, and in this article, we’re going to guide you through all the steps you need to take.
Can You Convert Everything to QuickBooks Online?
The most important thing to remember about converting QuickBooks Desktop to the Online version, is that the success of the process will depend on the complexity of your company file.
This file contains all the information regarding your business, including inventory, banking history, employee information, accounting records, and suchlike. That means the smaller the company file is, the greater likelihood of success is going to be.
But regardless of the file size, there will be some information that just won’t convert:
- Attachments
- Audit Trail
- Bills and Bill Payments
- Chart of Accounts
- Journal Entries
Some of the data that will convert:
- Assemblies
- Budgets
- Closing Date Password
- Customers and Jobs
- Estimates
- Reimbursable expenses
Before You Begin the Migration Process
Before we go through the steps you have to take to convert the data from the desktop to the online version of QuickBooks, some preparation is involved. This will ensure that the whole process is done correctly.


Back Up the Company File
Here’s how you back up the company file:
- Click on the “File” from the main menu in QuickBooks Desktop.
- Click on the “Backup Company” and then select “Create Local Backup.”
- Now select “Local Backup” followed by “Next.”
- Select “Browse” in the “Local Backup Only” section and choose where you want to save the file.
- Click “OK” when you’re ready to continue.
- Select “Save it now” followed by “Next” to confirm your choice.
Save the Sales Tax Liability Report
You will need to either save or print a copy of your Sales Tax Liability Report because you’ll use it for adjustment entries once the migration is over. Here are the steps to follow:
- Click on “Reports” on the main menu and then “Suppliers and Payables.”
- Click on “Sales Tax Liability.”
- Click on the “Dates,” and from the drop-down menu, select “All.”
- Select “Print” on the top and then “Save as PDF.”
- Select the folder location and click “Save.”
Create a QuickBooks Online Account
The final step of the preparation is to open a QuickBooks Online account. But before you do that, make sure that you’ve reviewed all the online plans available and picked the one best suited for your company.
When you create the account, you’ll have 60 days to complete the migration. Keep in mind that you’ll need to use the same email and password you used for the desktop version in order to create the QuickBooks online.
Migrating from QuickBooks Desktop to QuickBooks Online
All of the considerations you have to go through before you start migrating your company’s data might seem like a lot.
But in reality, these preparations are absolutely necessary if you want to have all of the information at your disposal from any device, anywhere in the world. If you have completed everything up to this point, follow the steps below:
- Open QuickBooks Desktop on your computer and log in as admin.
- Press “Ctrl+1” to see the “Product Information” window.
- Then press “Ctrl+B+Q” and then click on “OK.”
- Select “Start your export” on the export window.
- Then, sign in to your QuickBooks Online account as admin.
Setting up Your Inventory
While the export process is ongoing, you can set up your company’s inventory in QuickBooks online. This is how you do it:
- Log in and go to “Settings,” followed by “Account and Settings.”
- Click on “Sales” and then select the “Products and Services” section.
- Click on the “Edit” (pencil icon.)
- Make sure that the “Show Products/Service column” on the sales forms is turned on.
- Then turn on the “Track quantity and price/rate” and the “Track inventory quantity on hand.”
- Finally, click “Save,” followed by “Done.”
These steps are going to set you up on QuickBooks online. You will have to enter some data manually, but the main bulk of data will be there, ready and waiting.
Steps to Take After You Convert from QuickBooks Desktop to QuickBooks Online
After you’ve successfully transferred the data to QuickBooks online, here are some of the most important tasks you should perform:
- Compare your reports
- Confirm company settings
- Configure sales tax
- Connect bank and credit card accounts
- Clean up bank reconciliations
- Link payments and credits
- Complete the payroll setup
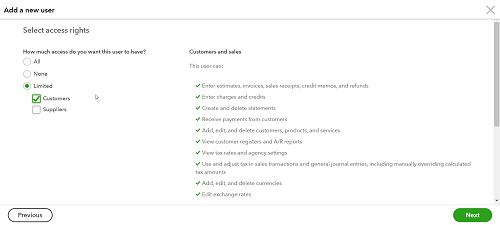
- Add users
Keeping Up with Accounting Anywhere You Go
QuickBooks desktop has some advantages. For example, you can use it offline, which isn’t possible with QuickBooks online. However, that’s where the upsides end. The internet is readily accessible in most areas, and the convenience of having QuickBooks on any device is hard to overstate.
Especially if you have the desktop version on your home computer and not a laptop. And while the migration will take a few more clicks than anticipated, it’s still a relatively easy process.
Are you considering switching from QuickBooks Desktop to QuickBooks Online? Let us know in the comments section below.


